 0 comments
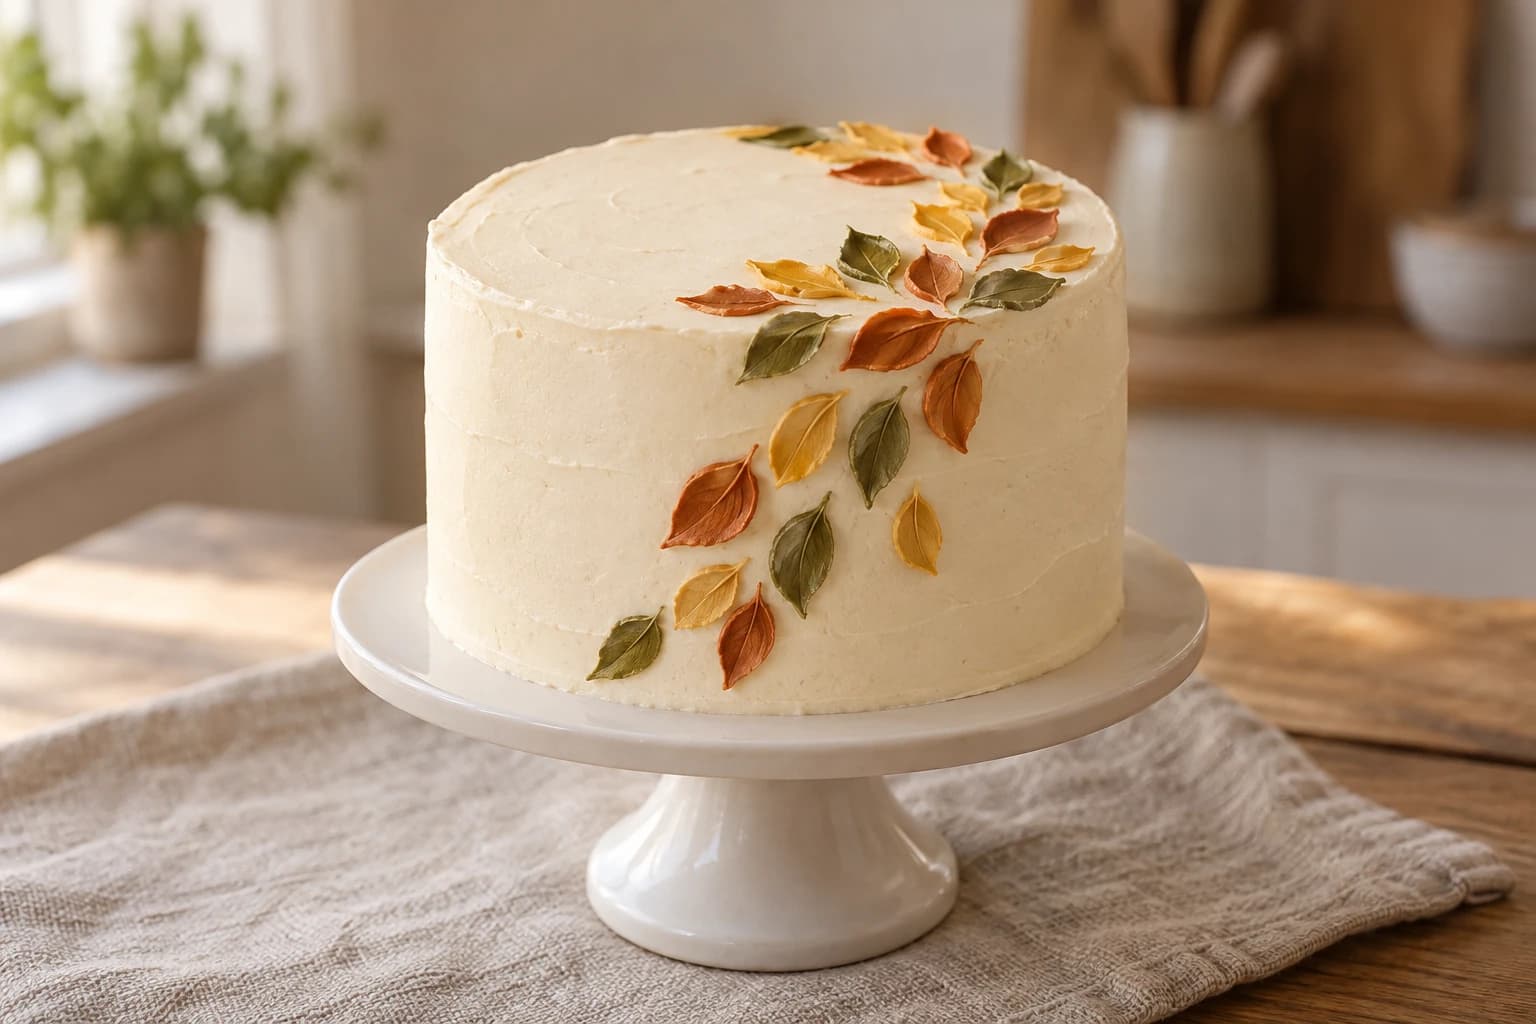
An autumn cake does not need sculpted pumpkins or a forest of toppers. A few tapered buttercream swipes can suggest fallen leaves while leaving most of the ivory surface visible. This tutorial uses a small palette knife and a fully baked, cooled cake rather than a new sponge formula. The design is intended for a 15 cm (6-inch) round cake about 8–10 cm tall. The buttercream quantities and decorating method are not kitchen-tested; practice on parchment before working on the cake. The hero image is an AI-generated concept, so use the written method as your guide rather than expecting an identical result.
Before you start
- 15 cm (6-inch) round, fully baked and cooled cake on a food-safe board; use your chosen cake recipe for pan depth and oven temperature
- Digital kitchen scales
- Mixing bowl and electric mixer
- Small offset spatula and straight scraper
- Small food-safe palette knife with a rounded blade about 1–2 cm wide
- Three small bowls and spoons
- Parchment paper for practice
- Food-safe cake box and refrigerator space
Choose a cake and plan the leaf crescent
Use a stable, completely cooled cake with a level top. If you bake it yourself, follow the pan size, oven temperature, baking and cooling instructions of the chosen recipe; this tutorial does not include a sponge recipe or require an oven. Fill and stack only cooled layers. A simple buttercream filling suits this design; any more perishable filling sets the storage limit.
Imagine a crescent beginning near the back of the top, curving along one edge and descending a short way down the front. Aim for roughly 15–20 leaves, each around 2 cm long, with ivory gaps between them. Sketch the curve on paper first. Leave the center open; a crowded blanket of leaves hides both the shape and the frosting texture.
Make egg-free buttercream and split the colors
Beat 250 g softened unsalted butter until smooth. Add 500 g sifted icing sugar in several additions on low speed, then add 5 g vanilla extract, 1 g fine salt and 20 g pasteurized milk. Beat until combined; add up to 10 g more milk only if the frosting feels too stiff to spread. Mix slowly at the end and press it against the bowl with a spatula to reduce air pockets. This is an untested decorating formula, not a promise of a particular yield or finish.
Reserve approximately 600 g for the ivory coating. Divide about 150 g between three bowls and keep the remainder for repairs. Tint the bowls rust orange, mustard and muted olive with small amounts of edible gel color, following the label. A touch of brown can mute orange or yellow. The leaf frosting should hold a small ridge but release smoothly from the blade; use a little reserved ivory frosting to soften an overly dark color.
Coat, chill and check the surface
Spread a thin crumb coat over the filled cake and refrigerate for about 20 minutes, until the surface feels firm rather than sticky. Cover with the remaining ivory coating, retaining some for repairs. Smooth with a scraper or leave delicate shallow spatula marks; avoid deep ridges where the leaves will sit. Refrigerate for another 20 minutes or until firm.
The cake must be cool and stable, but not wet with condensation. If moisture beads form after it leaves the refrigerator, wait in a cool room until the surface is dry before adding leaves. Keep the colored buttercream soft enough to spread; a refrigerator-cold bowl of frosting is likely to drag the base.
Practice one leaf before making a cluster
On parchment, load a small dab of colored buttercream onto the underside of the knife near its tip. Set the loaded area against the paper at a shallow angle. Press gently to make a rounded wider end, draw the knife about 2 cm, then ease the pressure and lift to taper the end. The leaf is a single flat teardrop swipe, not a piped rose or a deeply sculpted shape.
Repeat until the frosting leaves the knife without a thick lump. Scrape the blade clean between swipes. If a leaf cracks, the frosting may be too stiff or the blade may be lifting too abruptly. If it spreads into a puddle, cool the bowl briefly and stir before trying again. Adjust in small steps; large additions of milk are hard to reverse.
Build the crescent without smearing earlier leaves
Begin with a few rust leaves at separated points along your planned curve. Add mustard and olive between them, turning the blade so the leaves point in slightly different directions. Alternate colors instead of making three solid blocks. Keep gaps and vary the spacing rather than making an exact repeating border.
Work from the top toward the side, rotating the cake board so you can approach the surface comfortably. On the side, use a smaller dab and light pressure; a heavy leaf can sag. Keep the knife clear of finished leaves and avoid stacking wet swipes. A cluster of three can connect the top and side without covering the entire wall. Stop while the ivory surface still feels spacious.
Repair, serve and store
If a leaf smears, chill the cake until that patch is firm. Lift away the colored frosting gently with a clean spatula, patch the ivory base, chill the patch and try a smaller leaf. Scraping repeatedly on a warm cake can pull crumbs into the surface. A stray mark can also become the end of a slightly wider crescent, provided it does not turn the design into a dense band.
Box and refrigerate the finished cake. For a freshly assembled cake, plan to serve within 3 days or within the shorter storage limit of its sponge or filling; decoration does not restart the storage clock. Keep it away from strong-smelling foods. Let it soften briefly before serving, judging the texture in your room, and follow the filling recipe's limits for time outside refrigeration. Do not display a dairy-frosted cake beside a heater or sunny window.
For a practical make-ahead plan, bake and cool the cake according to its recipe, then decorate the day before serving. Test your box height before starting. If freezing, follow the underlying cake recipe and expect the leaf surface to need touch-ups after thawing; fine colored details can collect condensation.
Egg-Free Buttercream and Autumn Leaf Cake Assembly
- Makes, at 1×
- One decorated 15 cm (6-inch) round cake, about 8–10 cm tall
- Prep
- 1 hr
- Baking
- 0 min
- Start to finish
- About 1 hr 40 min
Start with completely cooled cake; allow about 40 minutes of chilling in two stages, longer if the surface is still soft.
Original recipe draft · not yet kitchen-tested. Baking times are estimates; use the doneness checks in the method.
Ingredients
Cake base
Buttercream
Decoration
Let’s make it
- Start with a fully baked and completely cooled 15 cm (6-inch) cake about 8–10 cm tall on a food-safe board. Level and fill it as directed by its own recipe. No oven is used for this decorating recipe; use the chosen sponge recipe's pan and oven instructions.
- Beat the softened butter smooth. Mix in icing sugar gradually, then vanilla, salt and 20 g milk. Add up to the remaining 10 g milk only if needed for a spreadable frosting that holds a ridge. Finish with slow mixing and press out large air pockets.
- Reserve approximately 600 g ivory frosting for coating, 150 g divided into rust, mustard and olive leaf colors, and the remainder for repairs. Tint using edible gel colors sparingly.
- Apply an ivory crumb coat and chill about 20 minutes until firm. Finish the ivory coat and chill another 20 minutes or until firm. Wait for any surface condensation to dry.
- Practice on parchment: load a small dab near the knife tip, press at a shallow angle, draw about 2 cm and lift with decreasing pressure to make a tapered leaf. Clean the knife between leaves.
- Place approximately 15–20 leaves in a loose crescent over the top and a little way down the front side. Alternate colors, change their direction and leave ivory gaps. Use smaller dabs on the side.
- Chill before repairing any smears. Box and refrigerate; serve within 3 days of fresh assembly or the shorter limit of the base or filling. Let the frosting soften briefly before serving within the filling's room-temperature limits.
not kitchen-tested. This is an estimated decorating formula and assembly tutorial based on established American buttercream and palette-knife techniques. It does not include a sponge formula; the cake weight is an approximation, and pan depth, oven temperature, baking time and initial cooling must come from the chosen cake recipe. Chilling times vary with room temperature and refrigerator performance. Food color quantity depends on the product; follow its label. The concept image is AI-generated and does not document a tested result. Milk is pasteurized and no raw eggs are used. Follow the shortest storage limit among sponge, filling and frosting.
The little details
- Use only edible frosting and food-safe tools; real autumn leaves do not belong on the cake.
- Practice the side swipe on a chilled, buttercream-coated flat surface before reaching around the cake.
- A muted three-color palette and visible ivory gaps give the design more clarity than adding many leaf colors.
- Keep one clean knife for the ivory repair frosting so colored streaks do not contaminate it.
Your questions, answered
Do I need a leaf piping tip?
No. This design uses a small food-safe palette knife and a press, draw and lift motion. It makes flat teardrop leaf impressions rather than piped veined leaves.
Can I use purchased buttercream?
Yes, if it is intended for cake coating and holds a small ridge. Practice a leaf first. Very soft frosting may need chilling, while stiff frosting may drag; follow the product's handling and storage instructions.
Can I decorate a shorter single-layer cake?
Yes. Keep the crescent mostly on the top and reduce the amount of buttercream and number of leaves. The quantities here are estimates for a 15 cm cake around 8–10 cm tall.
Made it? Let’s talk.
Share how your bake went, ask a question, or pass on a helpful tip. There’s a seat for you here.
A kind kitchen is a happy kitchen. Our community guidelines →
No comments yet. Be the first to say hello.