 0 comments
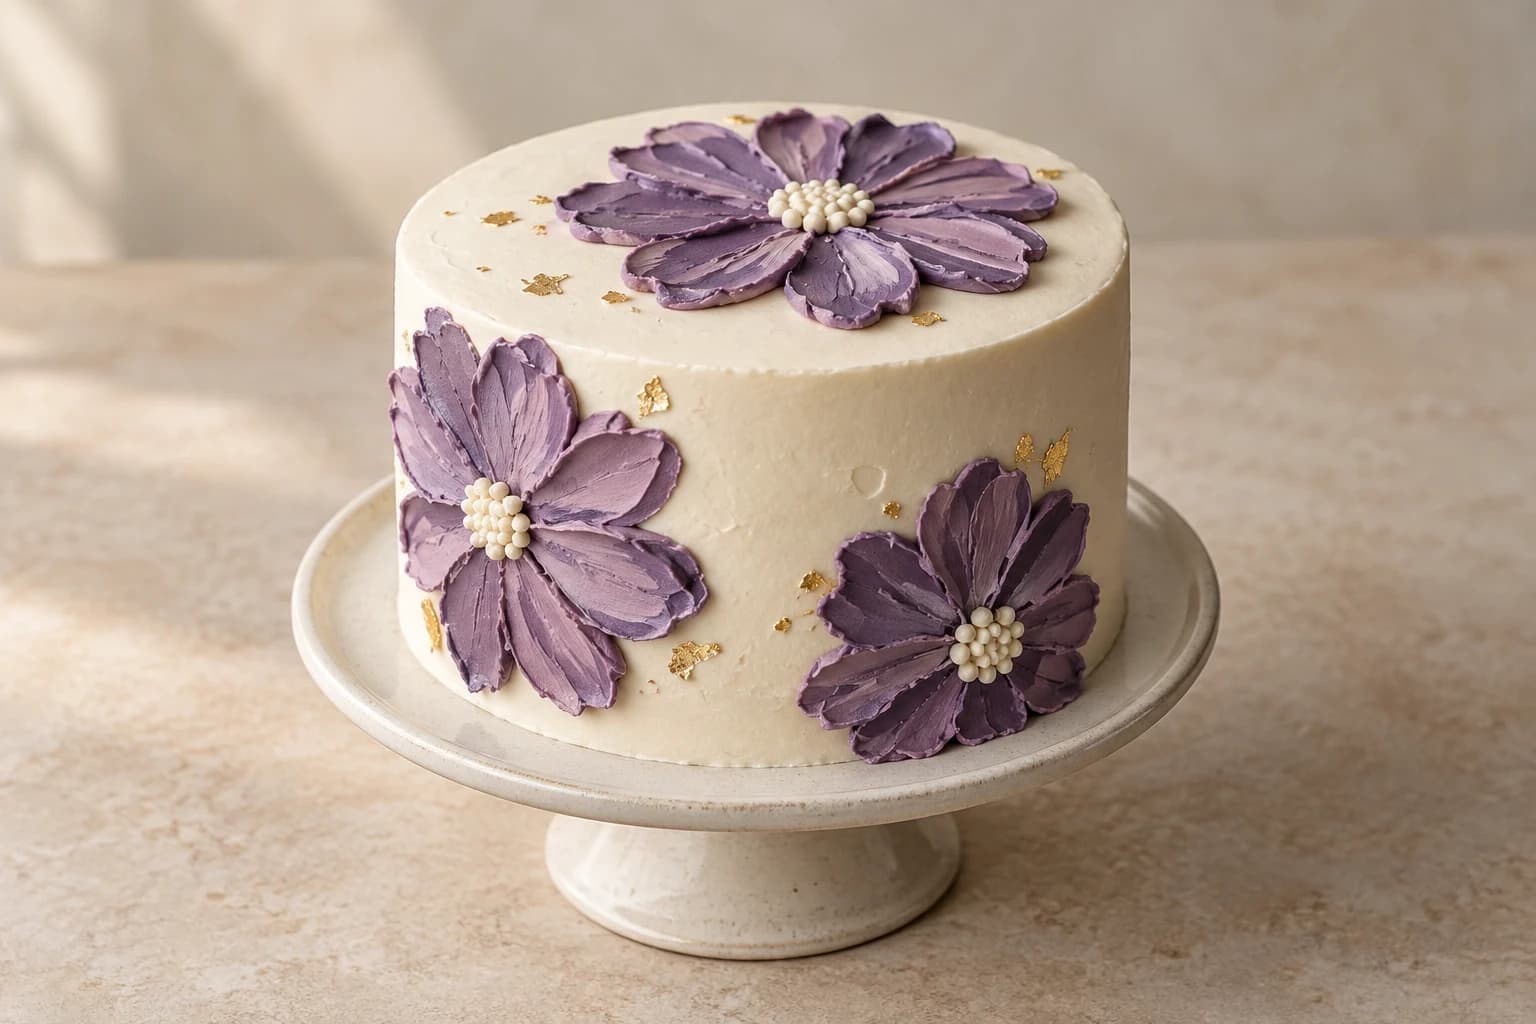
Large purple petals need broad, deliberate strokes rather than a scatter of tiny blossoms. This guide keeps the ivory base mostly open and builds three daisy-like flowers with a small palette knife. Start with already baked, cooled layers; the focus is on frosting consistency and controlled petal placement. This is Kumora’s original interpretation of a Pinterest design, not the pictured baker’s recipe or method. The reference remains credited to its original creator.
An original Kumora recipe inspired by the linked cake design. The linked reference is decorating inspiration, not evidence of a kitchen-tested result from this recipe. The cover is identified in its caption.
Before you start
- Two cooled 15 cm / 6-inch round cake layers, each about 4 cm high
- 900 g prepared ivory piping buttercream; food-grade violet gel color
- Digital scale, bowls, spatula, turntable and 20 cm food-safe board
- Small rounded palette knife with a blade about 2 cm wide; scraper
- Parchment for practice; small round piping tip
- Optional gold leaf specifically labeled edible, clean food-use tweezers
Plan the flowers and portion the frosting
Use a sturdy cake from a recipe you trust, with level layers and a finished height around 9 cm. A simple buttercream filling is easier to stabilize than a deep fruit or whipped-cream filling. Prepare 900 g buttercream: 150 g for filling, 120 g for a crumb coat, 380 g for the final ivory coat, 220 g purple for petals and 30 g ivory for centers and repairs. These are planning quantities with practice and bag residue included.
Color the petal portion gradually with food-grade gel, following the label. Choose one medium purple, allowing the sculpted shadows to provide variation. Reserve the ivory portions before coloring. Do not try to create sculptural relief with thin glaze or whipped topping: use a buttercream that holds a soft upright peak without crumbling.
Build a firm ivory canvas
Attach the first layer to its board with a dab of frosting. Spread the filling evenly, set the next layer on top and check level from two directions. Crumb-coat thinly and chill 20–30 minutes until firm. Add the final coat, drawing the scraper around the cake without repeatedly exposing the sponge.
Chill until a very light touch does not lift frosting, usually another 15–25 minutes depending on your fridge and buttercream. Lightly mark three flower centers: one off-center on top and two separated on the visible side. Leave roughly half the cake surface undecorated. Keep side flowers away from the board edge so their lower petals have room.
Load the knife and practice a broad petal
Place a small mound of purple frosting on parchment. Draw the flat underside of the knife through it so a rounded bead sits near the tip, rather than coating the whole blade. On a second piece of parchment, set the loaded tip at the future outside edge of a petal, press lightly and pull inward toward the flower center. Reduce pressure and lift as you reach the center, leaving a broad outer end and a tapered inner end.
Practice petals about 2–3 cm long. The buttercream should release from the knife and retain a raised ridge. If it smears flat, cool the colored portion briefly; if it fractures, let it soften slightly and stir slowly. Do not add water to correct the texture. Wipe the knife between strokes so the next petal starts with a clean profile.
Make large flowers directly on the cake
Start with the top flower. Work around its center, placing seven to nine broad petals with their tapered ends meeting. Slight overlaps are useful, but avoid piling a second complete flower onto the first. Put the far petals down before the near ones, then pipe a small ivory center over the joins. A flower around 6 cm wide is enough on this cake.
For each side flower, rotate the board to face the working area and hold the knife nearly parallel to the local cake surface. Use slightly smaller 2 cm strokes so gravity does not pull a heavy mound downward. Work the lowest petals first, then the sides and upper petals. Rest your free hand on the turntable edge rather than against the cake. Chill between flowers if the ivory base begins to soften.
Add edible accents and repair cleanly
Gold is optional. Use a product expressly labeled edible, not merely non-toxic craft foil. Apply a few tiny flecks to the firm surface using clean dry food-use tweezers, following the product directions. Keep them separate from the flower centers so the purple shapes remain readable. Do not copy lettering, watermarks or a creator’s branded details.
A torn petal is easier to replace than to polish repeatedly. Chill the flower, lift the damaged stroke with a clean knife, patch the ivory base if needed and apply one fresh petal. If purple streaks spread into the background, stop and chill before repairing. Keep a small ivory repair portion uncontaminated. Slightly irregular edges suit sculpted petals; aim for a consistent scale rather than identical flowers.
Presentation, transport and storage
Place the finished dessert on a clean food-safe board or plate and use a box with clearance above and beside every decoration. Chill before transport, support the board from underneath and keep it level on a nonslip surface in a cool vehicle. Avoid adding paper cards, fabric, wire or florist materials to the edible surface. The concept hero illustrates the intended look; it is not a photograph of a tested result.
Refrigerate covered at 4°C or colder. For best quality, plan to serve within 3 days, following any shorter limit on your cake, filling, frosting or decoration packaging. This is a conservative planning window, not a validated shelf-life claim. Keep leftovers covered and refrigerate promptly. Soften only the cake portions you will serve briefly in a cool room.
Keep perishable desserts out of refrigeration for no more than two hours in total, reduced to one hour above 32°C / 90°F; decorating, transport and display time count together. Use a clean knife and wipe it between portions. This temperature and time guidance follows the FDA’s safe storage advice (https://www.fda.gov/consumers/consumer-updates/are-you-storing-food-safely).
The little details
- Practice one complete flower on parchment before decorating the cake.
- Keep sculpted petals shallow enough to hold on a vertical side.
- Use a clean blade for each stroke; dried frosting makes ragged edges.
Your questions, answered
Can I use a spoon instead of a palette knife?
The rounded back of a small spoon can make broader swipes, but it is harder to taper the inner end. Practice at the same size; reduce the number of petals if they become wider.
Is this the original baker’s technique?
No. Only the visible design is the reference. This is an original decorating interpretation, and the source recipe and method are unknown.
Can the petals be made ahead?
Practice ahead on parchment, but apply the large sculpted petals directly to the firm cake. Transferring a broad unsupported buttercream swipe often breaks it.
Made it? Let’s talk.
Share how your bake went, ask a question, or pass on a helpful tip. There’s a seat for you here.
A kind kitchen is a happy kitchen. Our community guidelines →
No comments yet. Be the first to say hello.