 0 comments
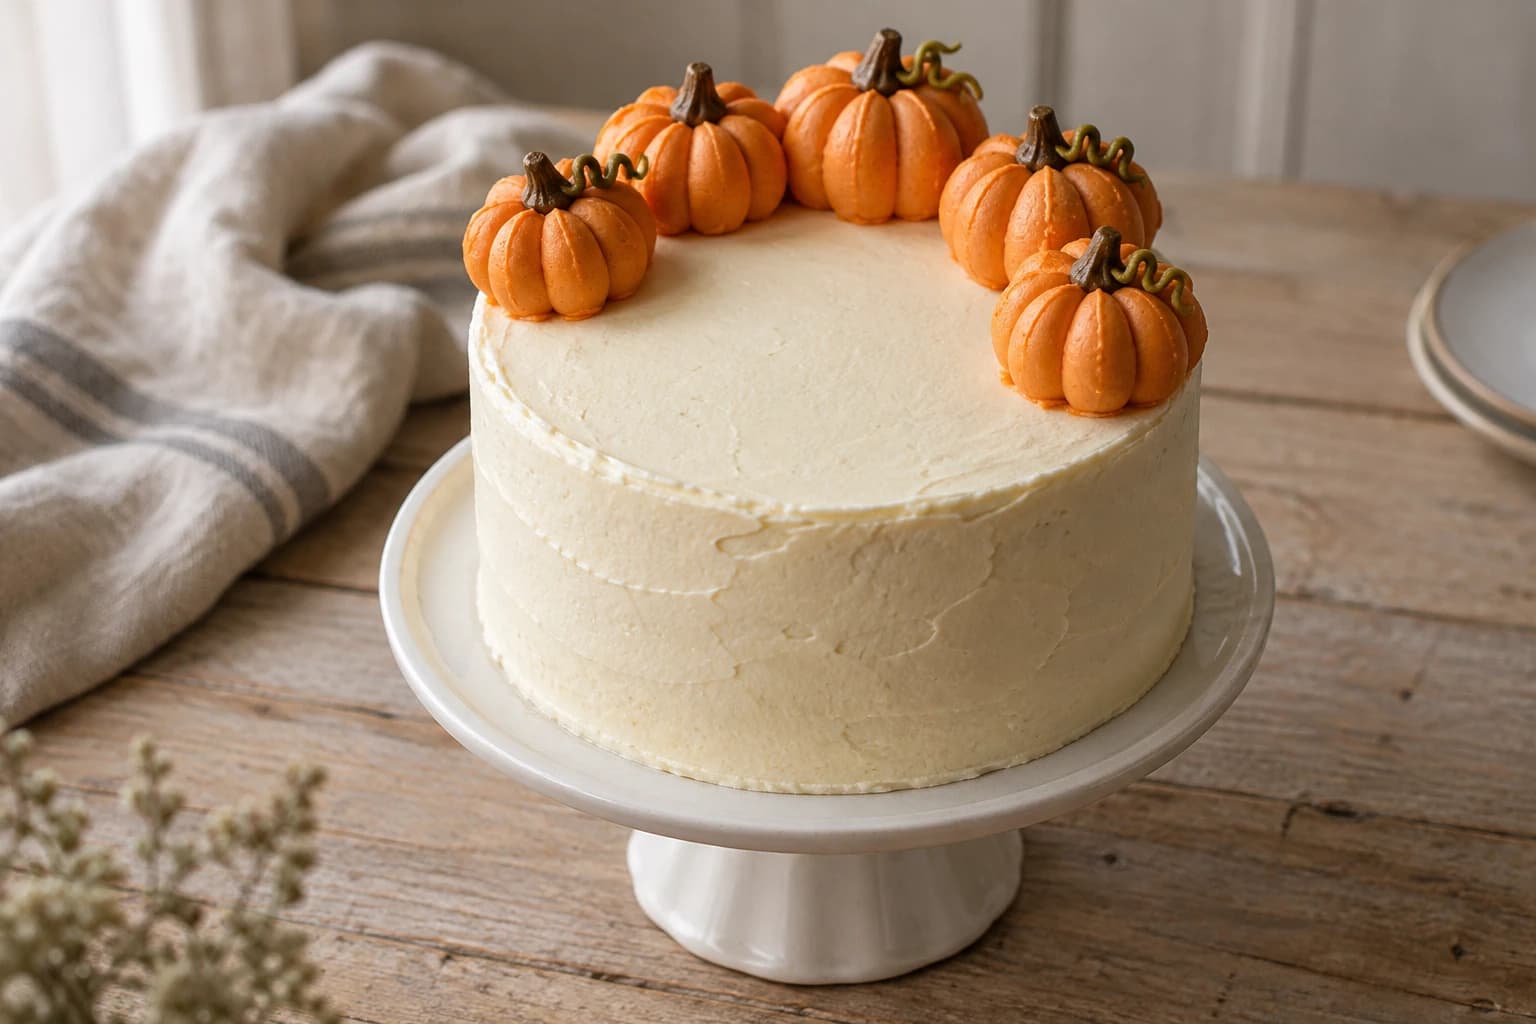
A few small buttercream pumpkins can give a plain cake an October finish without covering every surface. This design uses a round piping tip to build rounded segments around a small frosting mound, then adds short brown stems and a few green curls. Keep the pumpkins low and leave the center open so the cake is easy to portion. This decorating assembly is not kitchen-tested; the images are AI-generated concepts, and your piping will have its own texture and proportions.
Before you start
- Two fully baked and completely cooled 15 cm / 6-inch round cake layers, approximately 3 cm tall each
- Digital scales, bowls and flexible spatula
- Small offset spatula and cake scraper
- 20 cm cake board or flat serving plate; turntable optional
- Piping bags and a plain round tip with a 5–6 mm opening
- Small round tip with a 2 mm opening for stems and curls
- Food-safe parchment for practice and a refrigerator
Start with a cooled cake and a modest layout
Use two 15 cm / 6-inch round cake layers, each about 3 cm tall, from a recipe you trust or a bakery. A combined weight near 500 g is a planning guide rather than a baking target. This tutorial begins after baking: no cake pan or oven heating is needed for the decorating stage. If baking your own layers, use the pan size, oven temperature and doneness instructions in that separate recipe; allow both layers to cool fully on a rack before assembling.
Plan five pumpkins, each about 2–2.5 cm across and no more than 2 cm high, along the rear half of the cake. Keep them about 1 cm inside the edge and leave small gaps. The open center gives the eye a resting place and lets you cut between decorations. Four pumpkins also work if your practice shapes are larger.
Choose and divide the buttercream
Use 700 g of prepared egg-free vanilla American-style buttercream that holds a soft upright peak. Purchased frosting varies: choose one labeled suitable for piping, rather than a pourable icing or soft whipped topping. A pasteurized dairy base is suitable; do not add raw eggs. This guide does not provide a cake or buttercream formula.
Reserve 500 g ivory frosting for filling and coating, 160 g for orange pumpkins, 20 g for brown stems and 20 g for olive-green curls. Color the small portions with food-grade concentrated gel, adding a tiny dab at a time according to the product directions. The amounts include practice and bag residue. Let the orange color develop for a few minutes before adding more.
Stir each portion gently with a spatula to press out large air pockets. Pumpkin frosting should extrude without excessive force and keep a rounded ridge. If it slumps, cool the bag briefly and check again. If it breaks or resists piping, let it soften slightly and stir. Temperature changes should come before changing the formula.
Fill, crumb-coat and finish the base
Fix the first layer to the board with a dab of frosting. Spread about 120 g of the ivory portion over it, leaving the filling slightly back from the edge. Add the second layer and check that the cake sits level. Apply about 100 g in a thin crumb coat; refrigerate for 20–30 minutes until the surface feels firm.
Spread the remaining ivory frosting over the top and sides. A softly scraped finish suits the pumpkins, so stop before repeated scraping exposes crumbs. Chill another 15–20 minutes until the surface is firm enough that a light touch will not pull it away. Do not pipe onto visible condensation; let surface moisture dry in a cool room first.
Practice one pumpkin before piping the crescent
On food-safe parchment, pipe a small orange mound about 1 cm across and 1 cm high as a support. Hold the round tip near the base on the far side of the mound. Squeeze to anchor a thick bead, guide it upward along the mound toward its top, then reduce pressure and stop before lifting away. You are laying a rounded rib over a support, rather than drawing a thin line on a flat surface.
Repeat around the mound, turning the parchment as needed, until roughly five to seven touching ribs enclose it. Finish the visible front ribs last. Keep the top slightly flattened and the base wider than the height. Exact rib count matters less than an evenly rounded, squat shape. If ribs merge, the frosting may be too warm or the mound too large; practice smaller before decorating the cake.
Mark five positions very lightly in the chilled cake frosting with the tip of a clean spatula. Pipe the support mounds directly onto those positions, then cover each with ribs using the practiced motion. Start at the farthest position so your hand does not brush finished pumpkins. Stop between pumpkins to wipe the tip and check the gaps.
Add edible stems and restrained curls
With brown frosting and the small round tip, pipe a short upright stem in the top of each pumpkin. Keep it only about 4–5 mm high; stop pressure before lifting. The stem covers the meeting point of the orange ribs. Use buttercream for the stem rather than a twig, florist wire or a hidden stick.
Pipe two or three short olive-green curls across the group, resting them on the pumpkin or cake surface instead of trying to suspend them in the air. A small loose S is enough. Leave most of the ivory surface visible. All decorative elements in this design are edible frosting.
Repair a pumpkin without redoing the cake
For a peaked rib, touch only the peak with a clean, dry spatula once the frosting has firmed slightly. Do not wet the whole pumpkin: water can make the color streak. For a collapsed shape, chill briefly, lift the decoration away with a small offset spatula, patch the ivory base and pipe a smaller replacement.
If a rib has an air hole, add one short bead in the gap rather than tracing the whole pumpkin again. If your hand shakes while making curls, simplify to a single short curved line. Small variations in shape are easier to accommodate than crowded decorations.
Chill, transport and serve
Refrigerate the decorated cake in a covered cake box or tall container at 4°C or colder. For a plain cake with this buttercream finish, plan to use it within three days; any shorter limit required by the cake, filling or purchased frosting takes priority. Keep it away from strong-smelling foods. Do not press wrapping against the pumpkins.
Transport chilled on a level, nonslip surface in a box with headroom. Before serving, allow about 30–60 minutes in a cool room for the buttercream to soften, checking by texture rather than the clock. Keep total time out of refrigeration within two hours, or one hour above 32°C. Cut with a clean knife between pumpkins, wiping the blade between portions. Refrigerate leftovers promptly in a covered container.
Buttercream pumpkin patch decorating assembly
- Makes, at 1×
- One 15 cm / 6-inch two-layer decorated cake; approximately 6–8 small servings
- Prep
- 1 hr
- Baking
- 0 min
- Start to finish
- About 1 hr 50 min
Start with fully cooled cake layers; allow 20–30 minutes for the crumb coat and 15–20 minutes for the final coat to firm in the refrigerator.
Original recipe draft · not yet kitchen-tested. Baking times are estimates; use the doneness checks in the method.
Ingredients
Cake
Filling and coating
Pumpkins
Stems
Curls
Let’s make it
- No oven is needed: this is a decorating assembly for two already baked and fully cooled 15 cm / 6-inch cake layers. If baking them yourself, follow the separate cake recipe for pan preparation, oven temperature, baking and complete rack cooling.
- Use about 120 g ivory buttercream to fill the cake and 100 g to crumb-coat it. Chill 20–30 minutes until firm. Coat with the remaining ivory frosting and chill another 15–20 minutes.
- Stir the colored buttercream smooth. Practice a 1 cm orange support mound on parchment; pipe five to seven touching ribs from the base toward the top with a 5–6 mm round tip, stopping pressure before lifting.
- Space four or five small pumpkins in a crescent on the chilled cake. Pipe each mound and its enclosing ribs directly on the cake, working from the farthest decoration toward you.
- Use a small round tip to pipe short brown frosting stems and a few green curls. Keep the center open and all decorations low.
- Cover without touching the decorations and refrigerate at 4°C or colder. Use within three days or the shortest storage limit of the components. Soften briefly in a cool room before slicing; keep total time out within two hours, or one hour above 32°C.
This decorating assembly is not kitchen-tested. tested=false. Quantities and timing are planning estimates and depend on cake height, frosting and piping size. Prepared buttercream quantities include practice and bag residue. This is not a cake-baking or buttercream formula; no oven temperature applies to the assembly. Images are AI-generated concepts, not evidence of tested results. Check component labels for allergens and follow any shorter storage instructions.
The little details
- Keep a few practice pumpkins on parchment so you can judge texture before piping on the cake.
- Use the same orange throughout; differing pumpkin sizes provide enough variation.
- A tall pumpkin is harder to support. Reduce the center mound before adding more frosting.
- Clear a refrigerator shelf and check the height of your cake box before you start.
Your questions, answered
Does a pumpkin patch cake have to taste like pumpkin?
No. These pumpkins are vanilla buttercream decorations colored orange. Use a fully baked cake flavor you like; this tutorial does not add pumpkin puree or supply a pumpkin cake formula.
Can I use a star tip instead of a round tip?
A star tip makes ridged ropes and a different finish. The rounded segment method here uses a plain 5–6 mm round opening; practice with your actual tip before deciding the pumpkin size.
Can I decorate a single-layer cake?
Yes. The same top layout works on one 15 cm layer. You will need less frosting for the sides and no filling; keep the pumpkin portion for practice and adjust the ivory coating quantity to the height.
Made it? Let’s talk.
Share how your bake went, ask a question, or pass on a helpful tip. There’s a seat for you here.
A kind kitchen is a happy kitchen. Our community guidelines →
No comments yet. Be the first to say hello.