 0 comments
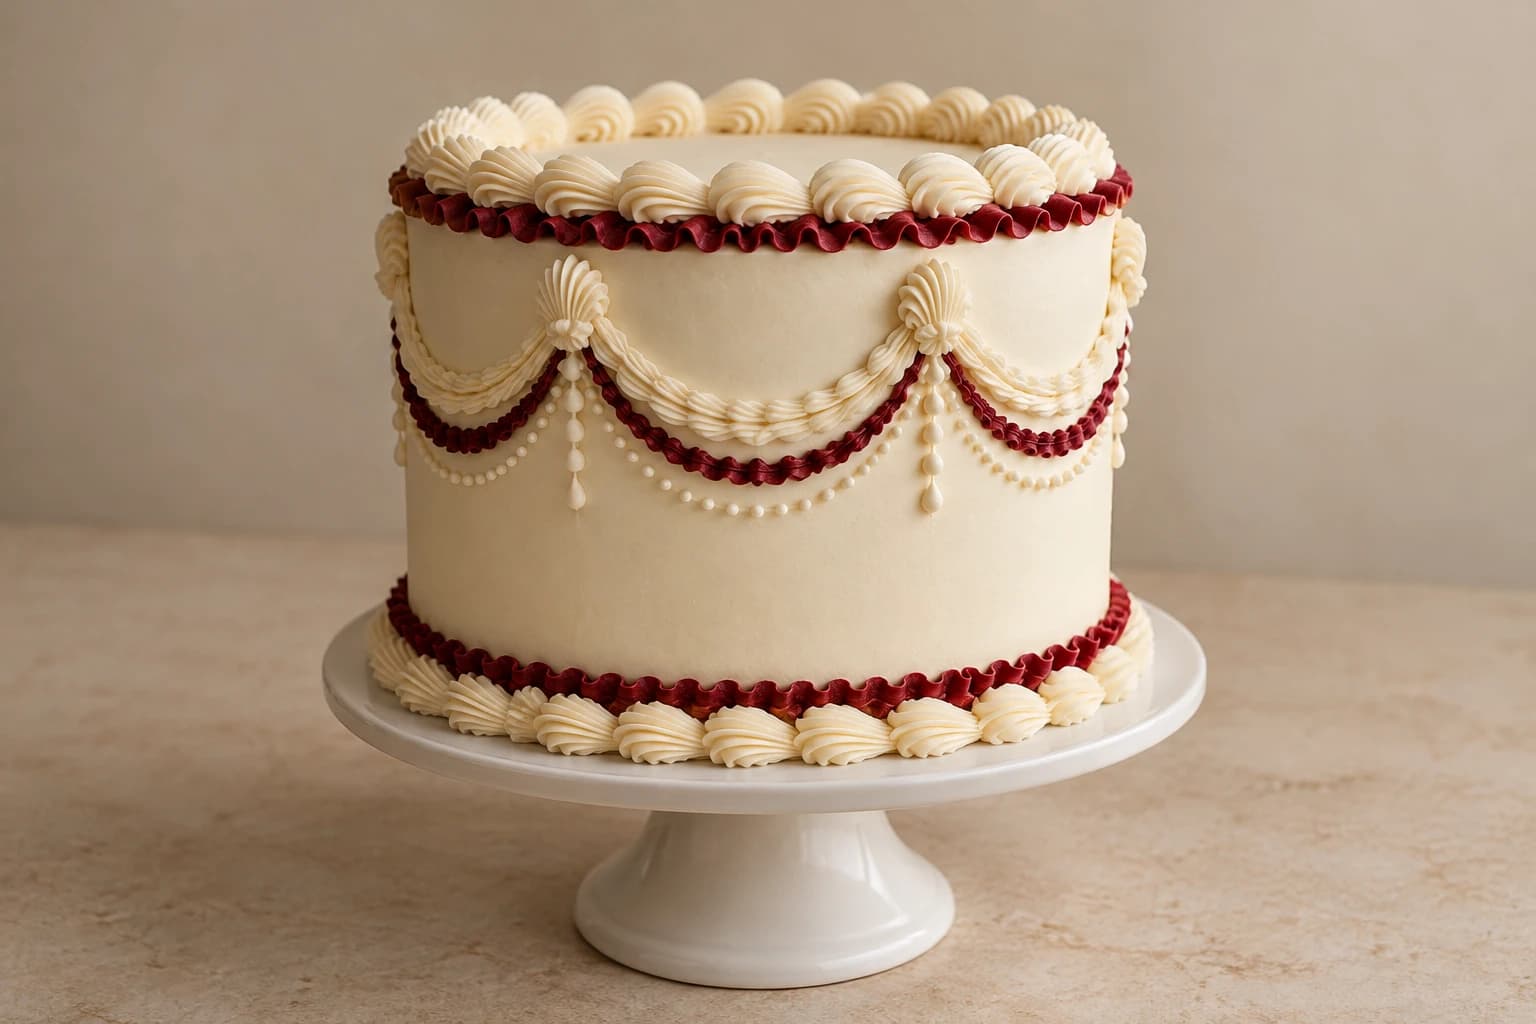
Two colors give ornate piping a clear structure: ivory for the cake and shells, burgundy for narrow ruffle bands and a second layer of swags. This original single-cake interpretation divides the work into six panels, building from lower details upward so the piping remains accessible. No tier stacking is involved. This is Kumora’s original interpretation of a Pinterest design, not the pictured baker’s recipe or method. The reference remains credited to its original creator.
An original Kumora recipe inspired by the linked cake design. The linked reference is decorating inspiration, not evidence of a kitchen-tested result from this recipe. The cover is identified in its caption.
Before you start
- Three cooled 15 cm cake layers, about 3 cm high
- 1,300 g prepared piping buttercream, divided into 1,000 g ivory and 300 g burgundy
- Concentrated food-grade burgundy gel; six small piping bags
- 20 cm sturdy board, turntable, scraper and offset spatula
- Medium star tip, small star tip, petal tip and 2–3 mm round tip
- Paper measuring strip, ruler and food-safe parchment for practice
Budget frosting and map six side panels
Reserve the 1,000 g ivory as 240 g for two filling seams, 140 g crumb coat, 350 g smooth finish and 270 g shells, swags, beads and practice. Divide 300 g burgundy into 180 g ruffle borders, 90 g secondary swags and 30 g repairs. This generous budget suits a cake around 10 cm tall; heavy piping or very large tips need more.
Make burgundy with concentrated food-grade gel following its label, then let the shade develop before adding more. Do not chase near-black color with excessive gel. Use a single ivory shade throughout. Test ivory and burgundy piping beside each other on parchment to confirm both hold their ridges.
Smooth the base and mark anchors
Fill, stack and crumb-coat the cake, then chill 25–30 minutes. Smooth the final ivory coat and chill until firm. Measure the circumference with a paper strip held just around the cake without dragging through icing; for a 15 cm cake it is roughly 47 cm. Divide the actual measured strip into six equal intervals, then use it to mark six anchors lightly near the upper side edge.
Mark a midpoint under each panel, about 2.5 cm below the anchors, for the lowest part of the first swag. Keep the bottom 2 cm of the side free for a lower border. All panels should have the same drop, even if your hand-piped arcs vary slightly. Start at the rear so the closing join is less prominent.
Pipe the lower burgundy ruffle and ivory shell border
Practice petal-tip ruffles first. Hold the wide edge toward the cake and narrow edge outward, with the tip nearly touching the base. Move steadily around the board with tiny back-and-forth folds while squeezing evenly, creating a shallow ribbon rather than long loose loops. Work in short sections and chill if it sags.
Add an ivory shell row above or just in front of the base ruffle. Hold the star tip around 45 degrees, squeeze to swell the head, then stop pressure and pull to a short tail. Start the next shell over that tail. Keep shells small enough that the future swags will not run into them.
Lay the swags from back details to front details
With a small round tip, pipe each ivory arc from anchor to anchor, allowing the icing rope to settle against the side through the marked midpoint. Keep the tip just off the surface and move at the same pace as the extrusion. Pipe one clean arc per panel, then a second parallel ivory arc slightly above it for a layered appearance.
Add a thinner burgundy arc just below the lower ivory swag, leaving about 3 mm between colors. The spacing is more useful than touching thick ropes. For bead chains, pipe small ivory dots beneath selected arcs, stopping pressure before pulling away. Build each bead individually; do not attempt unsupported dangling frosting. Keep every chain against the cake surface.
Cover anchors and finish the top last
Pipe small upright ivory shells at the six anchors to cover rope joins. Add the upper burgundy ruffle along the top rim, keeping it within the cake footprint, then an ivory shell row inside it. Work the rear half first so your hand does not cross finished front piping. The plain central top balances the ornate edge; no rose cluster is required.
If a swag breaks, stop and reconnect with a tiny bead rather than dragging a new line over it. For a large failure, chill, lift the bad arc with a small spatula and patch before replacing. Cracking shells suggest frosting that is too cold or stiff; slumping ruffles suggest too much warmth. Adjust temperature first and practice again. Do not conceal every mistake with extra burgundy: a little open ivory space keeps the pattern legible.
Presentation, transport and storage
Place the finished dessert on a clean food-safe board or plate and use a box with clearance above and beside every decoration. Chill before transport, support the board from underneath and keep it level on a nonslip surface in a cool vehicle. Avoid adding paper cards, fabric, wire or florist materials to the edible surface. The concept hero illustrates the intended look; it is not a photograph of a tested result.
Refrigerate covered at 4°C or colder. For best quality, plan to serve within 3 days, following any shorter limit on your cake, filling, frosting or decoration packaging. This is a conservative planning window, not a validated shelf-life claim. Keep leftovers covered and refrigerate promptly. Soften only the cake portions you will serve briefly in a cool room.
Keep perishable desserts out of refrigeration for no more than two hours in total, reduced to one hour above 32°C / 90°F; decorating, transport and display time count together. Use a clean knife and wipe it between portions. This temperature and time guidance follows the FDA’s safe storage advice (https://www.fda.gov/consumers/consumer-updates/are-you-storing-food-safely).
The little details
- Measure actual circumference instead of guessing six equal panels.
- Pipe low details before upper borders to keep your hands clear.
- Reserve a clean bag of each color for repairs.
Your questions, answered
Is this a tiered Lambeth cake?
No. It is one tall round cake with layered ornamental piping. The guide does not cover supports or stacked tiers.
Can I simplify it?
Keep the lower shell border, one ivory swag per panel and one top shell border. Add the burgundy ruffle only after those feel manageable.
Why does the rope fall away from the cake?
The arc may be too deep, the icing too soft or the tip too far from the surface. Use shallow arcs resting against a firm coat and reduce the distance before increasing pressure.
Made it? Let’s talk.
Share how your bake went, ask a question, or pass on a helpful tip. There’s a seat for you here.
A kind kitchen is a happy kitchen. Our community guidelines →
No comments yet. Be the first to say hello.