 0 comments
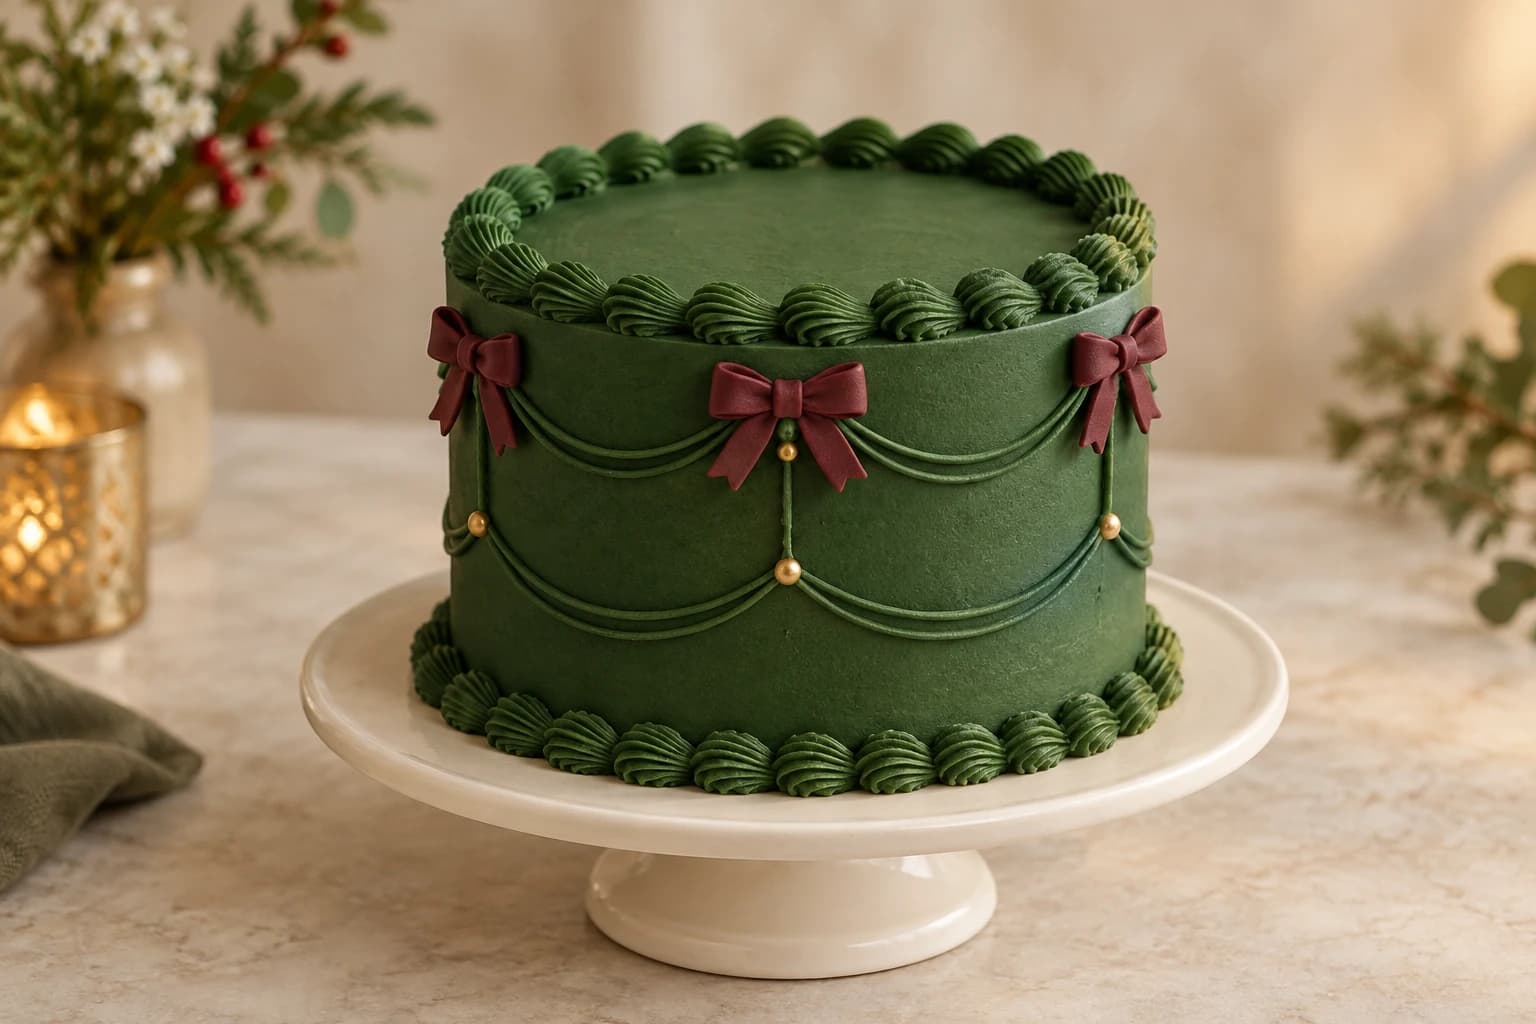
Deep forest-green piping, shallow hanging swags and edible burgundy bows give this cake its vintage character. Start with fully baked, cooled cake and prepared piping buttercream. This original Kumora interpretation is not the source baker’s recipe or method. The decorating plan is not kitchen-tested, and the cover is an AI-generated concept.
An original Kumora recipe inspired by the linked cake design. The linked reference is decorating inspiration, not evidence of a kitchen-tested result from this recipe. The cover is identified in its caption.
Before you start
- Digital scale, separate color bowls and flexible spatulas
- Rigid food-contact cake board at least 20 cm across, turntable and tall cake box
- Offset spatula, straight cake scraper and food-safe parchment for practice
- Piping bags, refrigerator and a clean dedicated food-use brush
- Three cooled 15 cm / 6-inch layers; finished cake about 10–11 cm high including filling
- Medium open-star tip, approximately 5–7 mm across, and 2–3 mm round tip
- Small food-use rolling pin, ruler, cutting mat and sharp fondant cutter
- 150 g ready-to-use edible modeling paste suitable for bows, edible adhesive and gold-colored edible sugar pearls
- 1,200 g prepared egg-free piping buttercream and food-grade green, brown and burgundy colors
Use one cylinder and plan two separate swag rows
Stack three firm, level 15 cm cake layers with thin buttercream fillings to a finished height around 10–11 cm. Keep this a single cake, with no upper tier, candle display or cameo ornaments. If your cake is substantially taller or unusually soft, use a proven support plan appropriate to that structure rather than adding unsupported layers for the photograph.
Divide the circumference into six equal panels. On a 15 cm cake, each panel is roughly 8 cm wide. Mark upper anchors about 2.5 cm below the top and lower anchors about 6 cm below it. Each U-shaped swag should dip only 1.5–2 cm, leaving room above the base shells. Position three or four bows at selected upper joins; not every join needs a bow.
Allocate the green frosting and edible decorations
Allow 1,200 g prepared egg-free piping buttercream: 180 g for filling, 150 g for the crumb coat, 420 g for the final coat, 350 g for both shell borders, 70 g for swags and 30 g for attachment and repairs. Color the entire batch forest green before dividing so the piping matches the cake. Quantities include practice and bag residue; taller cakes and large shells need more.
Use concentrated food-grade green gel, with a small touch of brown if needed to mute it. Rest and reassess the shade before adding more. Select about 18–24 small gold-colored sugar pearls explicitly labeled edible and permitted for food use where you live. Craft beads, non-toxic metallic dust and floral wire have no place in this edible design. Hard sugar pearls may be removed when serving young children or anyone who finds them difficult to chew.
Make lightweight burgundy bows in advance
Set aside about 150 g ready-to-use modeling paste suitable for thin bows, colored burgundy within the product’s directions. This provides several small bows and practice pieces. Work on a food-safe mat lightly dusted with icing sugar. Roll to about 1.5–2 mm thick. For each bow, cut two strips about 5 cm by 1.2 cm, fold each into a loop and pinch its ends together with a tiny amount of edible adhesive. Aim for a complete bow about 4 cm wide.
Rest each loop on its side, supported loosely with food-safe parchment so it retains a small opening. Let it firm according to the material’s instructions; overnight is a planning allowance, not a guarantee. Add two short tapered tails and cover the meeting point with a narrow center strip. Keep the back flat. Remove all parchment before attaching. This small two-loop version adapts the strip-folding principle described in Wilton’s fondant bows guide (https://wilton.com/how-to-make-fondant-bows-loops/wltech-35/).
Use the edible paste maker’s storage instructions for unattached bows. Plain fondant can stay soft in humidity; choose a material made to retain modeled shapes. Avoid adding arbitrary stiffeners or craft glue. If the loops remain too soft, use flat folded bows or piped loop-and-tail motifs rather than making thicker, heavier ornaments.
Fill and coat before marking the panels
Fix the first cooled layer to the rigid board with frosting. Spread the filling allowance between layers, stack level and apply the thin crumb coat. Refrigerate about 20–30 minutes until firm. Add the final green coat and smooth with an upright scraper, leaving a straight cylinder. Chill again before piping.
Wrap a strip of clean parchment around the cake without pressing into the frosting, mark its circumference and fold the removed strip into six equal sections. Use it as a spacing reference to make tiny anchor marks with a clean tool. Do not leave paper, pins or toothpicks in the cake. Make a front-facing join your focal position and place the border seam at the back.
Pipe the base shells, swags and top shells
Practice a short chain on parchment with the star tip. Hold the bag at roughly 45 degrees, squeeze to build a rounded shell head, then ease pressure while drawing a short tapering tail. Stop squeezing before lifting. Begin the next head over the last tail. Pipe the base ring first, keeping the bag clear of the board. The squeeze-and-release movement is described in Wilton’s beginner piping techniques (https://blog.wilton.com/beginner-piping-techniques/).
Use the round tip for the lower row of swags first. Anchor a short bead at a mark, continue squeezing gently while moving down and across the panel in a shallow U, then up to the next anchor. Keep the rope in contact with the surface so it is supported. Stop pressure at the join. Repeat the upper row. For the doubled-line look in the concept hero, add a parallel shallow curve a few millimeters below each first line; single curves are sufficient if spacing is tight.
Complete the top shell ring last, working from the back. Keep shell size consistent and adjust the last few slightly to close the ring neatly. Small connecting vertical lines between aligned anchors are optional; keep them fine so the hanging curves remain distinct.
Attach pearls and bows without hidden supports
Press a small edible pearl into fresh frosting at each visible swag join. Use a tiny green frosting dot if the join has firmed. Add a thin pad of reserved buttercream behind each completely set bow and position it at an upper join, above the swag rather than crushing it. Hold gently at the center until attached, then chill.
Test one small bow before placing the others. If it slips, take it off, firm the coat and reduce the bow’s weight. A side bow that will not hold securely should be replaced with a flat edible bow or moved onto the top near the edge. Do not hide skewers, wire or pins in a decoration guests may eat. Attach the most delicate loops after transport when practical.
Fix piping and serve the green-and-burgundy design
Shells losing their ridges indicate frosting that is too warm or loose; cool the bag briefly and practice again. Broken edges can indicate frosting that is too cold or stiff; let it soften and stir it smooth. Fill bags only halfway to keep pressure manageable. For an uneven swag, chill it, lift away the rope carefully and patch the green base before replacing it. More frosting over a slipping curve adds weight.
Present on a plain ivory board or plate and keep the open top clear. Box with clearance around the bows. Transport chilled and level. For quality, decorate within 1–2 days of serving and follow the shortest component storage limit. Refrigerate covered at 4°C or colder. Perishable fillings need a total room-temperature limit of two hours, reduced to one hour above 32°C; see FDA guidance (https://www.fda.gov/food/buy-store-serve-safe-food/refrigerator-thermometers-cold-facts-about-food-safety). Model-paste bows may soften in refrigerator humidity, so attach them near serving if their label requires dry storage. Remove hard ornaments as needed, slice with a clean knife and refrigerate leftovers.
Design reference
Design inspiration: https://www.pinterest.com/pin/1095852521858116860/ . This guide uses edible modeled bows and an original decorating sequence; it does not identify the materials used by the source baker. The cover was generated independently.
The little details
- Make a spare bow before decorating day; thin loops can break during handling.
- Keep the two rows shallow enough that their lowest points do not collide.
- Color the full green frosting allowance together before filling any bags.
- Chill the cake between piping sessions if your hands warm the bags.
Your questions, answered
Can fabric ribbon touch this cake?
Use edible modeled bows for this plan. Fabric ribbon, craft glue, wire and fastening pins are not ingredients. The source photograph does not establish whether its ribbon is food-safe or how it is attached.
Is this the dark-green baroque cake?
The designs share a dark green palette, but this guide teaches matching green shells, two rows of swags and burgundy bows. It does not use the framed cameo ornaments or candle display featured in the separate baroque guide.
Can I skip the gold pearls?
Yes. A tiny green or ivory buttercream dot can cover each join. The shell borders, shallow curves and contrasting bows carry the design without metallic decoration.
Made it? Let’s talk.
Share how your bake went, ask a question, or pass on a helpful tip. There’s a seat for you here.
A kind kitchen is a happy kitchen. Our community guidelines →
No comments yet. Be the first to say hello.