 0 comments
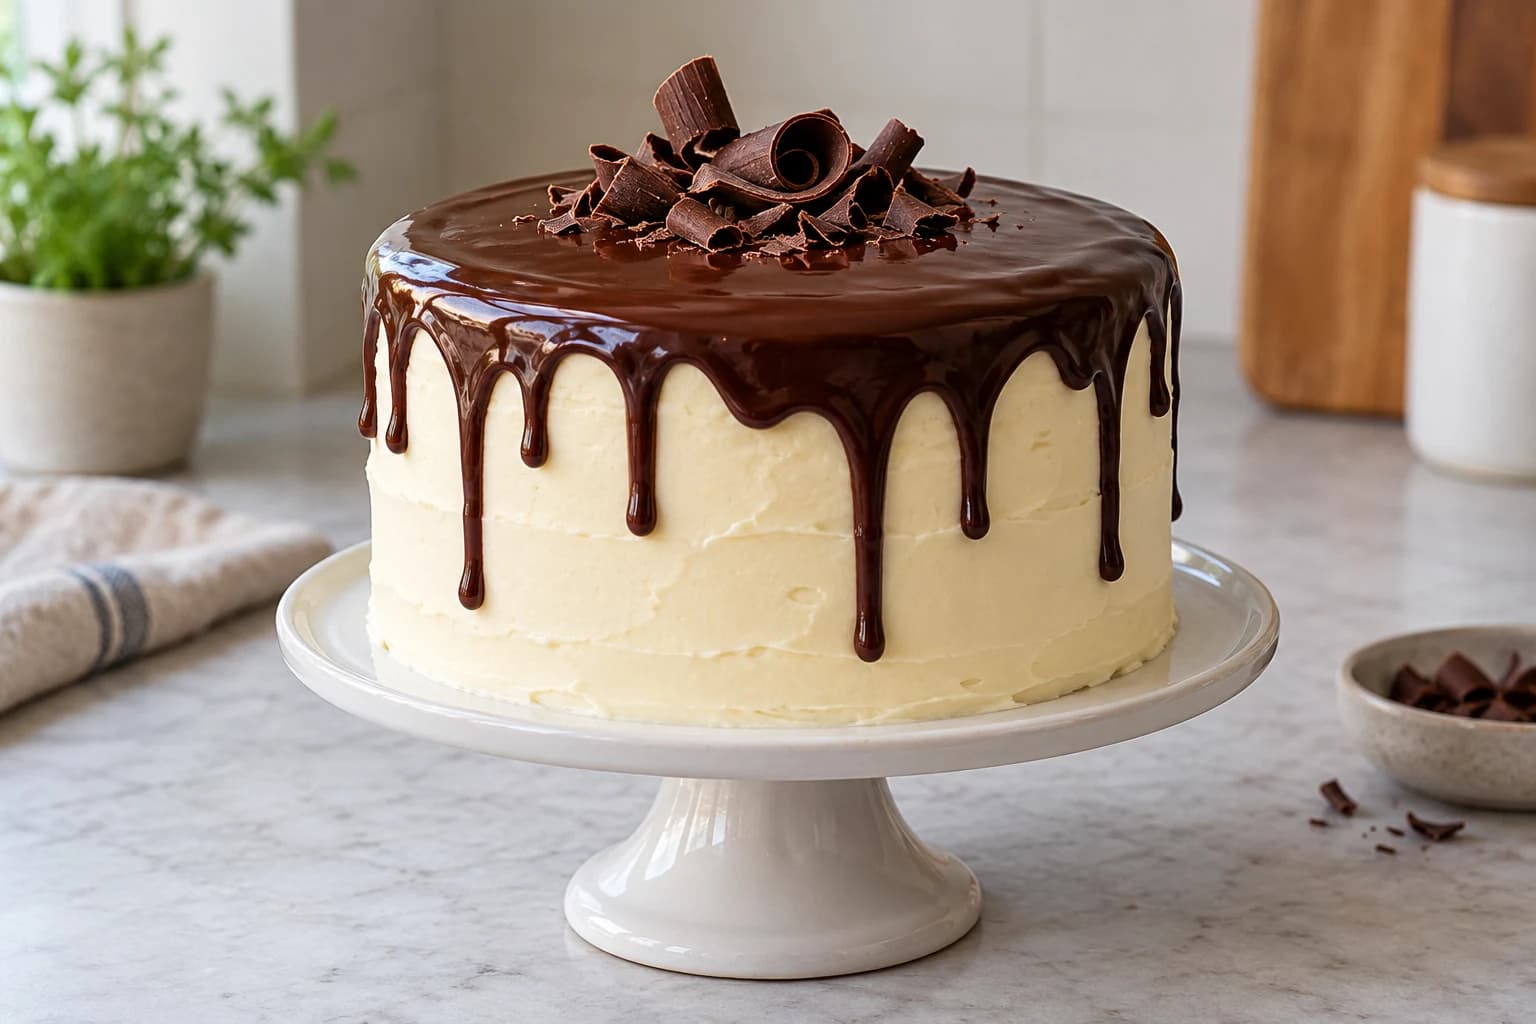
A drip cake is a frosted cake finished with ganache that runs over the edge in short, deliberate drips. This guide pairs a simple two-ingredient chocolate ganache with a small, single-tier cake and explains how to check its consistency before decorating. The recipe is not kitchen-tested, so allow extra time and use the visual cues below rather than relying on the schedule alone.
Before you start
- Two 20 cm (8 inch) cooled cake layers, made from a recipe you trust
- Cake board and turntable
- Offset spatula or bench scraper
- Digital kitchen scale
- Small heatproof bowl and saucepan or microwave
- Spoon or squeeze bottle for applying ganache
- Refrigerator thermometer
Why this version works
A drip is easiest to control when the cake is cold, the frosting is smooth and the ganache has cooled until thick but still flows. Chilling sets the frosting so a test drip can be checked before the rest of the edge is decorated.
The recipe uses semisweet chocolate and cream in equal weights for a straightforward ganache. Chocolate brands and room temperatures vary, so treat the suggested cooling time as a guide and check the consistency before applying it.
Ingredients and substitutions
Use finely chopped semisweet chocolate or semisweet chocolate chips with heavy cream. Finely chopped chocolate melts more evenly. For a less sweet finish, use bittersweet chocolate; it may set firmer, so check its flow and warm gently if needed.
Choose a firm filling and frosting suitable for a layer cake. Very soft whipped frosting can slide under the added weight, and ganache will not conceal an unstable cake. For a white chocolate drip, use a recipe developed for white chocolate rather than swapping it gram for gram; it needs different proportions.
Method, step by step
Bake and cool two 20 cm (8 inch) cake layers using a recipe you trust. Level the tops if needed and fill the layers with a stable filling. Apply a thin crumb coat, chill until the frosting feels firm to a light touch, then add a smooth final coat. Refrigerate the frosted cake while making the ganache.
Place the chocolate in a heatproof bowl. Heat the cream in a small saucepan until steaming and small bubbles appear around the edge; do not let it boil vigorously. Pour it over the chocolate, wait 2 minutes, then stir slowly from the center until smooth. If pieces remain, warm the bowl briefly over barely simmering water and stir again.
Let the ganache cool, stirring occasionally, until it is glossy and flows from a spoon in a continuous ribbon but is not hot. If using a thermometer, aim for about 30–32°C (86–90°F) as a starting point; check that it does not soften the frosting in a test spot. The cake should be cold and the frosting firm.
Test one drip at the back of the cake. Spoon a little ganache onto the top edge and let it run down. If it races to the board, cool the ganache further. If it barely moves, warm it gently. Once the test drip reaches the length you want, apply small spoonfuls around the edge, varying the amount slightly, then spread a thin layer over the top. Chill until the drips are set before serving or adding decorations.
How to tell the cake and drip are ready
The cake layers are done according to the cues in their baking recipe; a clean or nearly clean tester and a springy center are common signs for many butter cakes. Cool the layers completely before filling, or the frosting may soften and slide.
Ganache is ready to apply when it falls from a spoon in a steady ribbon and the test drip holds its path instead of running straight to the board. Once chilled, the drips should look set and no longer smear when lightly touched. If the frosting softens or ganache pools at the base, pause and chill the cake before continuing.
Storage and make-ahead
The cake can be layered and crumb-coated a day ahead; keep it covered and refrigerated. Make and apply the ganache closer to decorating, since it thickens as it cools. A decorated cake with perishable filling should be covered and refrigerated at 4°C (40°F) or colder, following the shortest storage limit for any filling or frosting used. For best quality, plan to serve within 2 days; this is a conservative planning suggestion, not a validated shelf-life claim.
Keep the cake at room temperature only while serving, and do not leave perishable cake out for more than 2 hours total, or 1 hour when the room is above 32°C (90°F). Refrigerate leftovers promptly in a covered container. Let individual portions lose their chill briefly before serving if desired.
Variations and finishing ideas
For a restrained adult celebration, pair a dark chocolate drip with fresh-looking but food-safe decorations such as labeled edible sugar pieces, chocolate curls or commercially packaged sprinkles. For a brighter look, use a contrasting frosting color and add decorations after the drip sets.
Keep toppers light so they do not press into the ganache or destabilize the cake. Use only decorations intended to be edible, and check packaging for allergen information.
How to do drip cake for beginners
Work with a chilled cake and a small amount of ganache at a time. A spoon gives direct control: touch a little ganache to the rim and allow gravity to form each drip. Practice the temperature on one test drip before moving around the whole cake.
If you are new to decorating, make drips of similar length by using roughly equal spoonfuls. Stop and chill if the frosting begins to soften. A few uneven drips are easy to disguise with a simple border of chocolate curls or sprinkles once the ganache has set.
How to decorate a drip cake for beginners
Keep the top finish simple: spread a thin, even layer of ganache over the center after piping or spooning the edge drips. Add a small cluster of edible decorations to one side rather than covering the whole top; this leaves the drip visible and makes the cake easier to slice.
For other beginner-friendly decoration approaches, see Pastel Palette-Knife Lemon Cake with Buttercream Flowers or Strawberry Crunch Sheet Cake with Cream Cheese Frosting. Birthday cakes has more celebration inspiration.
Chocolate Ganache Drip Cake
- Makes, at 1×
- One 20 cm (8 inch) two-layer cake, about 10–12 servings
- Prep
- 45 min
- Baking
- 32 min
- Start to finish
- About 3 hr 7 min
Allow about 75 minutes for cake layers to cool fully, 20 minutes to chill the crumb coat, 10 minutes for ganache to cool enough to apply, and about 15 minutes for the drips to set. These are planning estimates; use the visual cues in the guide.
Original recipe draft · not yet kitchen-tested. Baking times are estimates; use the doneness checks in the method.
Ingredients
Cake
Frosting
Ganache
Let’s make it
- Fill the cake layers with stable frosting and stack them on a cake board. Spread a thin crumb coat over the top and sides. Chill until firm, about 20 minutes, then apply a smooth final frosting coat and refrigerate while preparing the ganache.
- Put the chopped chocolate in a heatproof bowl. Heat the cream in a saucepan until steaming with small bubbles at the edge. Pour over the chocolate, wait 2 minutes and stir from the center until smooth.
- Cool the ganache, stirring occasionally, until it falls from a spoon in a steady ribbon and is warm rather than hot. About 30–32°C (86–90°F) is a starting point if using a thermometer. Test one drip on the cold cake and adjust: cool it further if it runs too far, or warm it gently if it barely moves.
- Apply small spoonfuls around the cake edge, checking each drip's length, then spread a thin layer of ganache over the top. Refrigerate until the drips are set, about 15 minutes, before adding decorations or slicing.
This recipe is not kitchen-tested. Prep and cooling times are estimates and can vary with cake recipe, room temperature and refrigerator. Use fully cooled layers and a stable filling; keep perishable cake covered at 4°C (40°F) or colder and follow the shortest storage limit for its ingredients. Do not leave it out longer than 2 hours total, or 1 hour above 32°C (90°F).
The little details
- Chill the frosted cake until firm before applying any ganache.
- Test one drip at the back before decorating the full edge.
- Warm thick ganache in short, gentle intervals and stir between each.
- If drips run too far, chill the cake before adding more ganache.
- How this guide was made: Kumora wrote it with AI assistance and automated editorial checks, and it has not been kitchen-tested. Bake with your own judgement, and tell us in the comments if anything needs fixing.
Your questions, answered
How do you make drip for a cake?
Warm cream, pour it over chopped chocolate, wait briefly and stir until smooth. Cool the ganache until it flows in a ribbon, then test a small drip on a cold, firmly frosted cake before applying the rest.
How do I make drip cake icing?
For a chocolate drip, ganache is a simple option: combine equal weights of semisweet chocolate and heavy cream, then cool it until thick but pourable. Check it on a test drip because chocolate and room temperatures affect how it flows.
Why are my cake drips running all the way down?
The ganache may be too warm or thin, or the cake may not be cold enough. Chill the cake and let the ganache cool until a test drip slows and holds its length.
Can I make a drip cake the day before?
Yes. Cover and refrigerate the decorated cake if it contains perishable filling or frosting. Follow the shortest storage advice for its ingredients, and bring out only what you plan to serve.
Made it? Let’s talk.
Share how your bake went, ask a question, or pass on a helpful tip. There’s a seat for you here.
A kind kitchen is a happy kitchen. Our community guidelines →
No comments yet. Be the first to say hello.