 0 comments
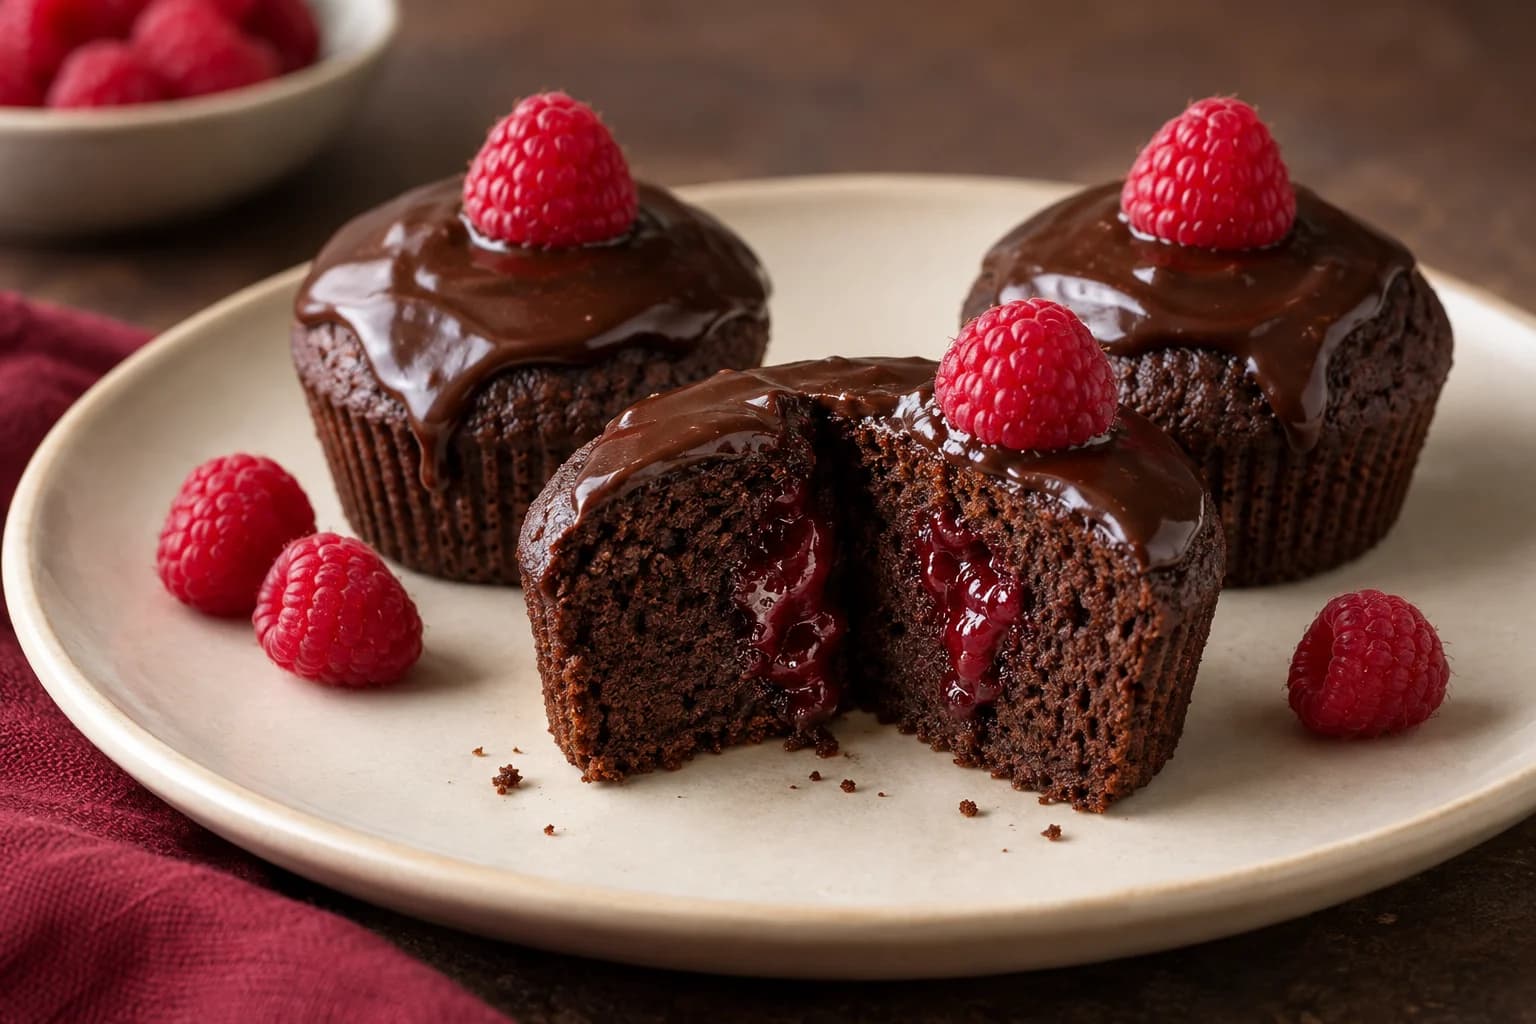
These mini chocolate raspberry cakes are for the moment you want individual celebration desserts but only own a regular muffin tin. Bake chocolate cakes in paper liners, remove the liners once cool, tuck a little raspberry jam into each centre and spoon ganache over the top. A fresh raspberry is the entire finishing touch. The full method below covers the batter, the size of the jam cavity and the ganache texture to aim for. This is an original Kumora recipe draft that has not yet been kitchen-tested; the AI-created image shows a serving concept, not a verified result.
Before you start
- One standard 12-cup muffin tin; not a mini-muffin or jumbo tin
- 12 standard paper muffin or cupcake liners
- Digital kitchen scale and measuring spoons
- Two mixing bowls and a heatproof jug
- Whisk and flexible spatula
- Small saucepan for warming the cream
- Wire cooling rack
- Small paring knife or apple corer, and a teaspoon
- Tablespoon for ganache; no piping bag required
Small celebration cakes without specialty pans
The cakes start with the same practical shape as a cupcake. Baking them in paper liners keeps removal manageable; peel off the liners only when the cakes are completely cool. They will retain the gently tapered shape and subtle ridges of a standard muffin cup rather than the straight sides of a cake baked in a ring.
A jam centre and glossy ganache make them feel like individual plated desserts. There are no stacked sponge layers and no tall frosting swirl. Set each cake on a small plate, or arrange all twelve on a platter with space between them so the ganache tops remain visible.
Use raspberry jam for the centre
Choose a thick raspberry jam or preserve that holds together on a spoon. Seedless jam gives the smoothest centre, while a seeded preserve adds texture. Fresh raspberry puree is much wetter and can soak into the crumb, so it is not a direct replacement in this method.
Make a cavity around 2 cm wide and 2 cm deep, leaving at least 1.5 cm of cake beneath it. Add approximately 10 g jam per cake. If your cakes are shallower, make a smaller hole and use less filling rather than cutting through the bottom. A trimmed piece of the removed cake acts as a lid under the ganache.
The spoonable ganache stage
This version uses dark chocolate with approximately 55 to 65 percent cocoa and double or heavy cream. Finely chopping the chocolate makes it easier for the hot cream to melt it evenly. Stir slowly from the centre until the mixture is glossy, instead of whisking in air.
Freshly made ganache may run straight off the cakes. Let it cool until a spoonful falls in a broad ribbon and a small amount on a plate spreads slowly. Then spoon it over each cake and nudge it toward the rim. A small drip is welcome; a puddle usually means the ganache needs more cooling. Milk and white chocolate need different ratios, so do not substitute them gram for gram.
A simple assembly order
Cool first, unwrap second, fill third, then add ganache. Trying to peel liners or cut a cavity while the sponge is warm can tear the sides. Work on a tray so each finished cake can go straight into the refrigerator if the kitchen is warm.
Finish with one dry, fresh raspberry on each cake while the ganache is still soft enough to hold it. The intended decoration is deliberately small: dark chocolate, one red berry and a visible jam centre when the cake is cut. No dusting of icing sugar is needed.
Make ahead for a birthday or dinner party
Bake the unfrosted cakes a day ahead and keep them airtight after they have cooled. Leaving the paper liners on until assembly helps protect the sides. You can also freeze the unfilled, undecorated cakes, well wrapped, for up to a month; thaw while wrapped before filling.
Keep filled and ganache-covered cakes in a covered container in the refrigerator and use within 3 days. Add fresh raspberries on the serving day for the best appearance. Let the cakes stand briefly before serving so the ganache softens, and return leftovers to the refrigerator promptly.
If the cakes dome, stick or lose their filling
Fill the liners roughly two-thirds full, distributing the batter as evenly as possible. Standard muffin tins vary, so keep the fill level consistent and bake any excess batter separately rather than overfilling. A small dome is fine under the ganache; if you prefer a level top, trim a thin slice after cooling.
For torn edges, wait until the cakes are fully cool before peeling away the paper. For leaking filling, check that the cavity has a substantial base and that the jam is thick rather than pourable. If the ganache starts firming before you finish, warm it very gently over barely warm water and stir until spoonable again.
Mini Chocolate Raspberry Cakes
- Makes, at 1×
- 12 standard muffin-sized cakes
- Prep
- 40 min
- Baking
- 22 min
- Start to finish
- About 2 hr 5 min
Allow about 60 minutes for the cakes to cool, plus time for the ganache to become spoonable. Plan roughly 2 hours overall.
Original recipe draft · not yet kitchen-tested. Baking times are estimates; use the doneness checks in the method.
Ingredients
Chocolate cakes
Raspberry filling
Chocolate ganache
To finish
Let’s make it
- Prepare the tin and oven. Heat the oven to 175°C / 350°F conventional, or 155°C fan. Line a standard 12-cup muffin tin with paper liners and place the oven rack in the centre.
- Bloom the cocoa. Put the cocoa in a heatproof jug and gradually whisk in the just-boiled water to form a paste. Whisk in the milk until smooth. Set aside until the mixture is lukewarm rather than hot.
- Mix the batter. Whisk the flour, baking powder and salt in a bowl. In a second bowl, whisk the sugar, eggs, oil, yogurt and vanilla until combined, then whisk in the lukewarm cocoa mixture. Add the dry ingredients and fold just until no dry flour remains. The batter should be pourable; do not keep beating it.
- Portion and bake. Divide the batter between the liners, aiming for about two-thirds full. Bake for approximately 18 to 23 minutes, checking from 18 minutes. The tops should spring back lightly and a skewer should show a few moist crumbs but no raw batter. Tin sizes vary; bake any excess batter separately rather than filling the cups to the rim.
- Cool. Leave the cakes in the tin for 5 to 10 minutes, then transfer them to a rack. Allow roughly another 50 minutes, or until completely cool. Peel away the paper liners carefully. If desired, trim only a very thin slice from any tall domes.
- Make the ganache while the cakes cool. Put the chopped dark chocolate in a heatproof bowl. Warm the cream in a small saucepan until steaming with small bubbles at the edge, then pour it over the chocolate. Leave for 2 minutes. Stir slowly from the centre until smooth. Let it cool, stirring occasionally, until it falls from a spoon in a broad ribbon and spreads slowly. Cooling may take 15 to 30 minutes or longer depending on the room.
- Fill the cakes. Cut a small cavity about 2 cm wide and 2 cm deep into the top of each cool cake, leaving at least 1.5 cm of sponge beneath it. Reserve the removed pieces. Spoon approximately 10 g jam into each cavity, stopping below the top. Trim each reserved piece into a thin lid and place it back over the jam. For a shallower cake, make a smaller cavity and use less jam.
- Spoon on the ganache. Divide the thickened ganache between the cakes, starting with a spoonful on each and adding more as needed. Nudge it toward the edge with the back of the spoon. If it runs off immediately, pause and let the remaining ganache cool further.
- Finish and serve. Place one dry raspberry on each cake while the ganache is still soft. Serve once the ganache has settled, or refrigerate covered until needed. Let chilled cakes stand briefly before serving so the chocolate topping softens.
Original recipe draft; not yet kitchen-tested. The generated image illustrates the intended presentation, and your cakes may differ. Total time is approximate; the ganache cools while the cakes cool. Use a standard muffin tin, thick raspberry jam and dark chocolate within the stated cocoa range. Store the filled cakes covered in the refrigerator for up to 3 days, adding fresh fruit on the serving day. Contains wheat, eggs and milk; chocolate may contain soy or other allergens, so check packaging.
The little details
- Use ordinary standard-size muffin cups. Mini-muffin and jumbo tins change both the yield and the timing.
- Reserve the cake plugs when making the cavities; trim them into small lids so the jam stays below the ganache.
- Judge the ganache by how it flows from a spoon, since cooling speed changes with room temperature and chocolate brand.
- Dry the fresh raspberries before decorating so water does not sit on the chocolate finish.
Your questions, answered
Can I make mini chocolate cakes without mini cake pans?
Yes. This version uses a standard 12-cup muffin tin and paper liners. Remove the liners after cooling, then add a jam centre and ganache. The cakes will have the tapered shape of the muffin cups.
Can I put raspberry jam in before baking?
This recipe fills the cooled cakes after baking so you can control the amount and position of the jam. Adding jam to the raw batter would change the method and has not been tested here.
Do I need a piping bag for the filling or ganache?
No. Use a teaspoon to add jam to the small cavity, replace a thin cake lid, then use a tablespoon to spread the ganache.
Why is my ganache running off the cakes?
It may still be too warm. Let it cool, stirring occasionally, until it falls in a broad ribbon and spreads slowly on a plate. The recipe assumes dark chocolate with roughly 55 to 65 percent cocoa; a different chocolate can change the consistency.
Made it? Let’s talk.
Share how your bake went, ask a question, or pass on a helpful tip. There’s a seat for you here.
A kind kitchen is a happy kitchen. Our community guidelines →
No comments yet. Be the first to say hello.