 0 comments
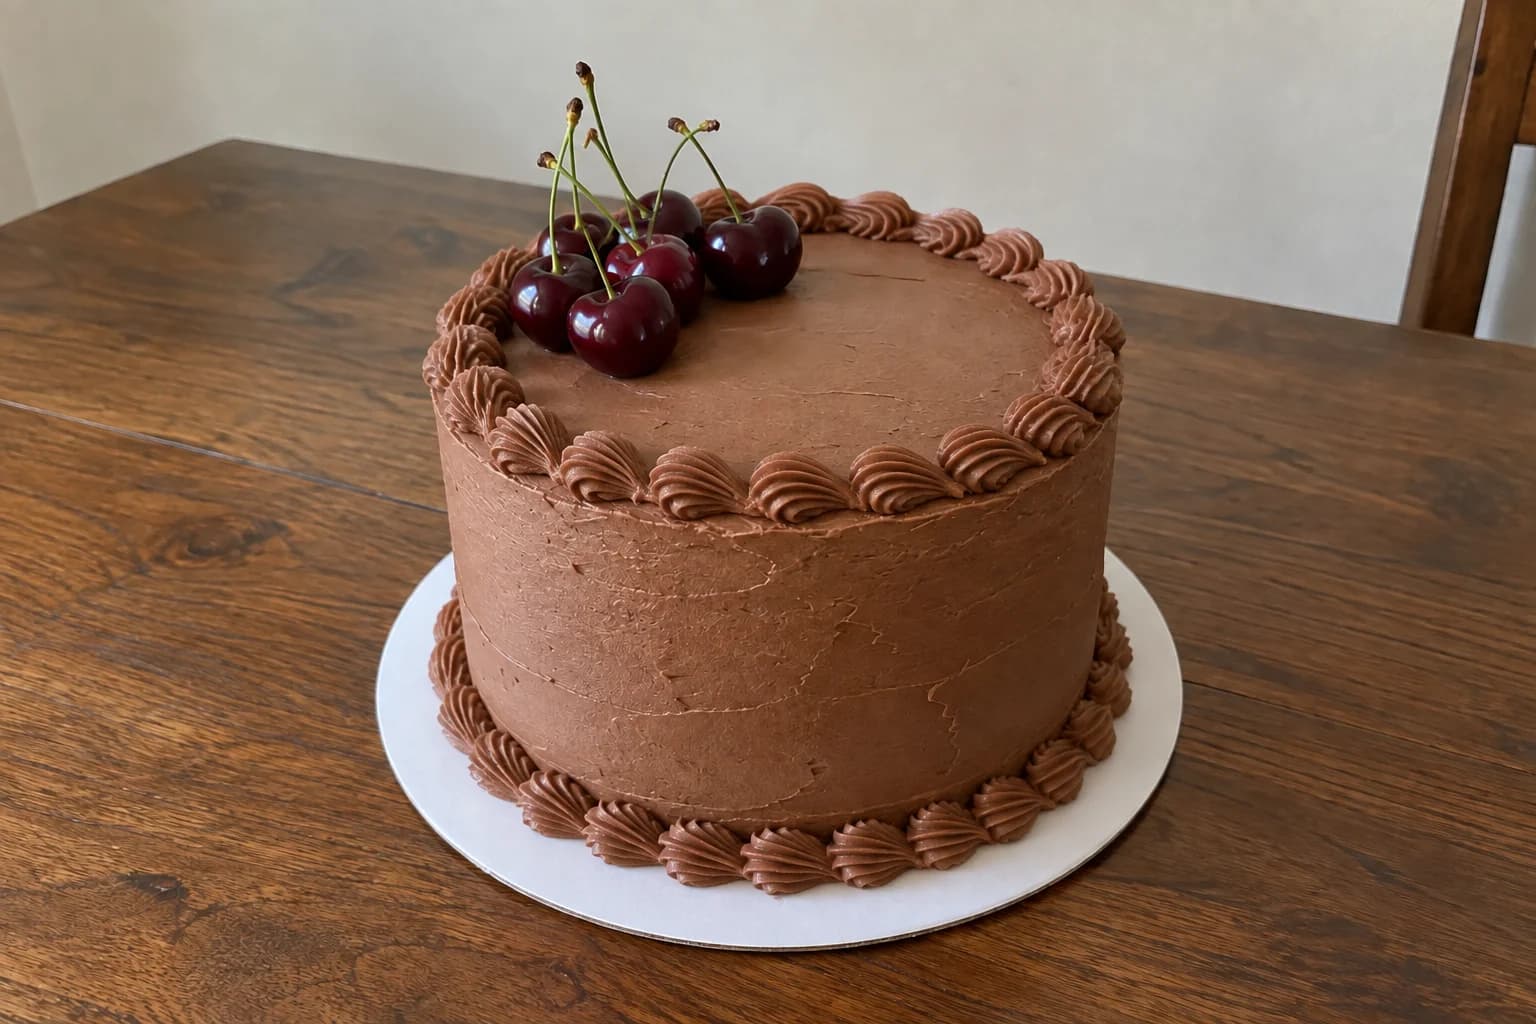
A chocolate shell border gives a simple birthday cake a vintage finish without covering every surface in piping. This guide focuses on one repeatable movement: build a ridged bulb, ease the pressure, then draw out a short tail. It includes a chocolate buttercream formula and a decorating plan for a two-layer, 6-inch cake. The frosting formula is an original, untested starting point; practice a short strip before committing to the cake.
Before you start
- Two baked, completely cooled 6-inch / 15-cm cake layers; approximately 4 inches / 10 cm tall once filled
- A cake board at least 8 inches / 20 cm across and a turntable if available
- Wilton 21 open-star piping tip, standard coupler and two 12-inch piping bags
- Scale, sieve, mixing bowl and electric mixer
- Small offset spatula, scraper and parchment for practice
- Six washed, thoroughly dried cherries for optional decoration; remove stems and pits before eating
Plan the cake before making the borders
Start with baked and cooled cake layers from a recipe you already trust. This page provides the frosting and decorating method, not a new cake-batter formula. A cake around 6 inches across and 4 inches tall leaves enough room for a top ring, a base ring and a small cluster of cherries.
For the approximately 1 kg frosting batch below, set aside about 180 g for filling, 150 g for a thin crumb coat, 350 g for the outer coat and 300 g for both borders and practice. These are planning allowances rather than exact coverage guarantees; thick filling and larger shells use more. Keep a little frosting in the bowl until you know the borders are finished.
Tip 21 and the texture test
Tip 21 is a small open-star nozzle that produces a ridged shell. Tip numbers are not universal across manufacturers: check the opening and photograph if substituting a different brand. A larger star nozzle changes both the look and the amount of frosting required.
The frosting needs to flow without straining your hand while holding the ridges after release. Pipe three test shells on parchment and leave them for a minute. If the ridges spread, the mixture may be too warm or too loose. If the fan breaks into rough fragments, it may be too cold or too dry. Correct a small test portion first rather than changing the whole bowl.
Fill, crumb-coat and chill
Level domed cake layers if needed. Place the first layer on the board with a dab of buttercream underneath, add an even filling layer and stack the second layer flat-side up. Keep the sides aligned; the border cannot compensate for a leaning stack.
Scrape on a thin coat that catches loose crumbs, then refrigerate until that coat feels firm, roughly 15 to 25 minutes depending on your refrigerator. Add the outer coat and smooth it with a spatula. A few shallow marks suit this homemade design. Chill briefly again if the coating moves when lightly touched.
Practice the shell movement
Hold the bag at roughly 45 degrees to the practice surface with the tip just above it. Squeeze to form a broad ridged bulb. Reduce the squeeze as you lower and draw the nozzle away, then stop pressure to finish a narrow tail. Start the next bulb over the previous tail.
Keep the same travel direction. An upright squeeze followed by lifting straight up creates a star or peak, not a shell. Try a line of ten shells on parchment; judge the rhythm of the whole chain rather than making each shell identical.
Pipe the base ring, then the top ring
Start the base border at the back of the cake, where the join will be least noticeable. Work a few shells at a time and turn the board so your wrist stays comfortable. Keep the tail of each shell lying along the curve of the cake board, with the next bulb covering it.
For the top border, pipe just inside the rim so the frosting has support beneath it. Stop two or three shells before meeting the start, assess the remaining space and make the last few shells slightly shorter if necessary. Finish the final tail under the first bulb. Avoid placing a large extra blob over the join.
Fix the cause before adding more sugar
Rounded ridges after a minute: check warmth first. Set the piping bag down and cool the frosting briefly, then stir and retest. Sugar cannot compensate indefinitely for melting butter. Jagged edges: let a cold portion soften, or add cream a few drops at a time if the mixture is genuinely dry.
Random gaps can come from trapped air. Fill the bag only about halfway, press the frosting toward the tip and expel the first little burst onto parchment. If one shell goes wrong, chill it until firm enough to lift away with a small spatula, repair the spot and pipe again. Avoid dragging wet frosting across its neighbours.
Cherries, storage and serving
Add the dry cherries near serving time and leave most of the top open so the border stays visible. Whole cherries in the illustration are decorative; remove stems and pits before serving them, especially to children. Do not hide loose pits inside a slice.
Keep the finished cake boxed in the refrigerator and follow the shortest storage time required by its cake or filling recipe; for this decorating plan, aim to serve within 2 to 3 days. A cake with a perishable filling needs refrigeration regardless of the outer buttercream. Avoid direct sun or a hot car, and follow the cake recipe’s serving guidance.
Technique references
The shell technique and tip choice were cross-checked against Wilton’s How to Pipe a Buttercream Shell Border: https://blog.wilton.com/how-to-pipe-a-buttercream-shell-border/ . The quantities, cake layout and troubleshooting examples here are Kumora’s original guidance.
For a visual reference to stiff, medium and thin icing, see Wilton’s Buttercream Frosting Consistency: https://blog.wilton.com/buttercream-frosting-consistency/ . The generated cover image illustrates the intended finish; use the written movement and your practice strip to guide the technique.
Chocolate Buttercream for Shell Borders and a 6-Inch Cake
- Makes, at 1×
- Approximately 1 kg; coverage depends on piping size
- Prep
- 20 min
- Baking
- 0 min
- Start to finish
- About 20 min
Buttercream preparation only. Cake baking, cooling, chilling and decorating take additional time.
Original recipe draft · not yet kitchen-tested. Baking times are estimates; use the doneness checks in the method.
Ingredients
Piping buttercream
Let’s make it
- Beat the softened butter on medium speed until smooth, about 2 minutes. Scrape the bowl. The butter should yield to a fingertip without looking melted.
- Mix the sifted sugar and cocoa together. Add to the butter in several portions on low speed, alternating with 30 ml of the measured cream. Add the vanilla and salt.
- Mix until smooth, scraping the sides and base of the bowl. Add the remaining cream a little at a time only if the frosting is too stiff to pipe. You may not need all of it.
- Stir slowly with a spatula to reduce air pockets. Reserve separate portions for filling, crumb coating, outer coating and borders according to the guide.
- Fit tip 21 to a half-filled piping bag. Pipe a test chain on parchment. Adjust a small portion until the frosting forms clear ridges and a tapering tail without excessive hand pressure.
Original Kumora frosting formula, not kitchen-tested. Adjust using the piping test before decorating. Contains milk. Quantities include frosting for filling and coating a small cake as well as two borders; this is not a cake-batter recipe. Baking and decorating times are additional. Cocoa brands absorb liquid differently.
The little details
- Use a short, steady squeeze for each shell; long pressure without movement makes oversized bulbs.
- Keep the same direction around both borders and place both joins toward the back.
- Warm hands can soften the frosting in the bag before the bowl of frosting feels soft.
Your questions, answered
Which tip makes a chocolate shell border?
This guide uses a Wilton 21 open-star tip. Other open-star tips can make shells, but their size and ridge pattern change the result and the frosting quantity.
Why do my shells look like stars?
You may be squeezing in one place and lifting vertically. For a shell, build the bulb and draw away while reducing pressure so the frosting ends in a sideways tail.
Can I decorate without a turntable?
Yes. Put the cake on a stable board and rotate it gently in small steps. Pipe from a comfortable angle rather than reaching around the far side.
Does this include a chocolate cake recipe?
The recipe card is for chocolate piping buttercream. Use two baked and cooled 6-inch cake layers from a cake recipe you trust; cake baking time is not included.
Made it? Let’s talk.
Share how your bake went, ask a question, or pass on a helpful tip. There’s a seat for you here.
A kind kitchen is a happy kitchen. Our community guidelines →
No comments yet. Be the first to say hello.