 0 comments
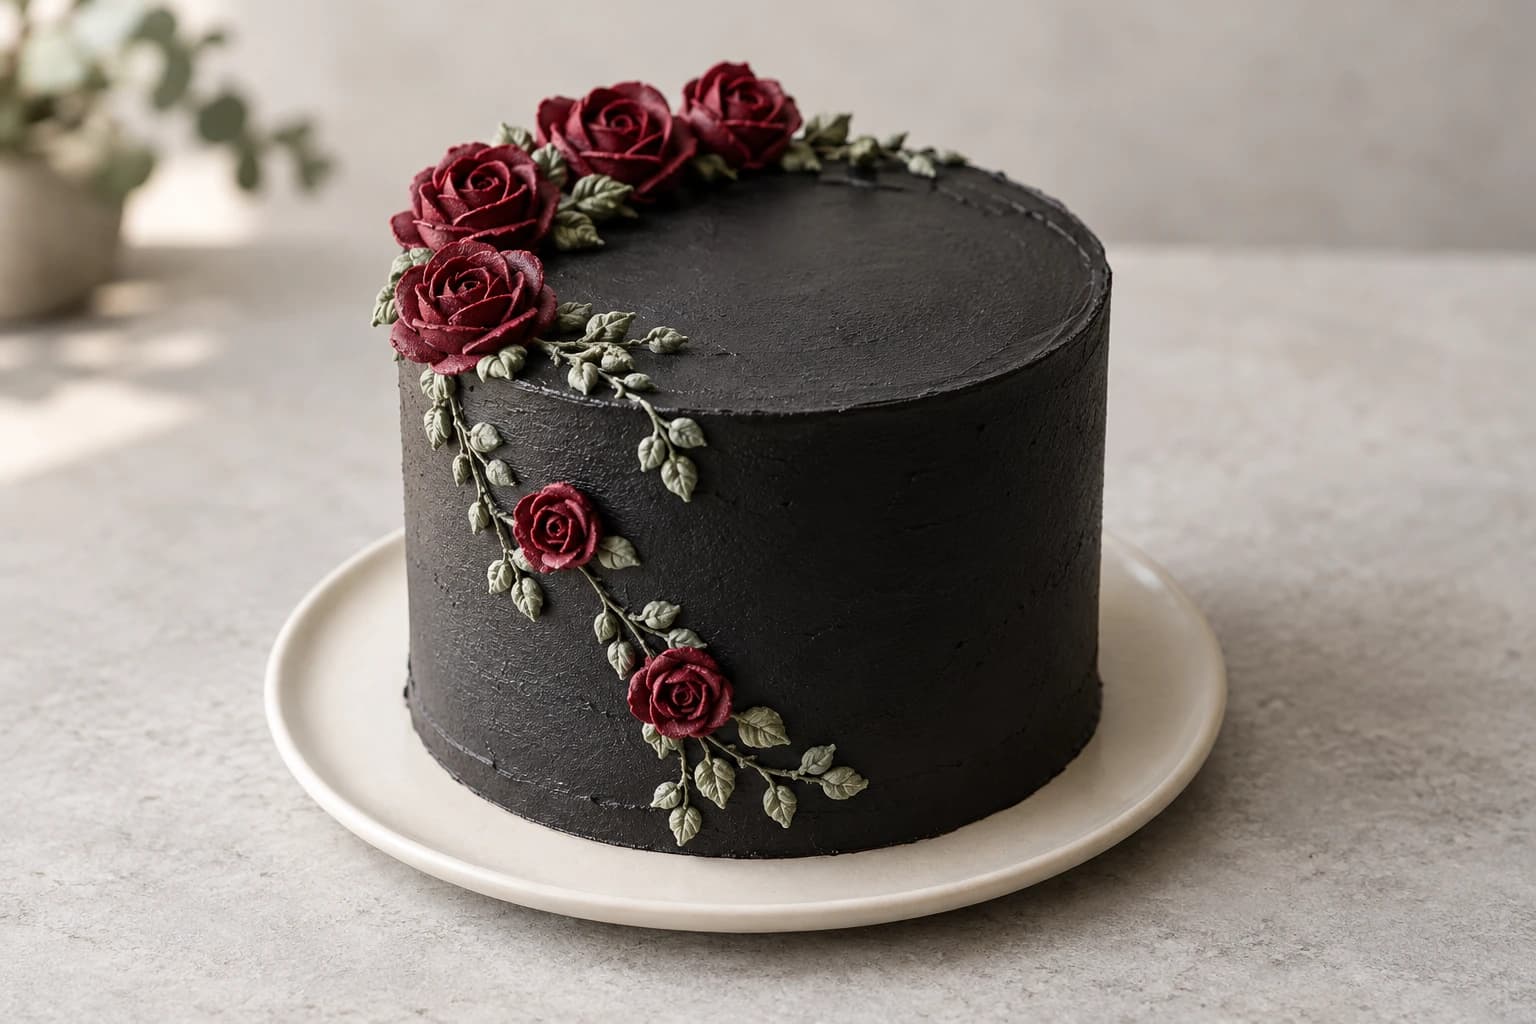
A smooth black cake makes burgundy roses and gray-green vines stand out. This original decorating guide keeps the flowers lightweight and the cake at a manageable home-decorating height. Start with fully baked, cooled layers and prepared buttercream. The plan is not kitchen-tested, and the cover is an AI-generated concept; neither reproduces the source baker’s exact cake or method.
An original Kumora recipe inspired by the linked cake design. The linked reference is decorating inspiration, not evidence of a kitchen-tested result from this recipe. The cover is identified in its caption.
Before you start
- Digital scale, separate color bowls and flexible spatulas
- Rigid food-contact cake board at least 20 cm across, turntable and tall cake box
- Offset spatula, straight cake scraper and food-safe parchment for practice
- Piping bags, refrigerator and a clean dedicated food-use brush
- Three firm cooled 15 cm / 6-inch cake layers; final height about 10–11 cm including filling
- Flower nail, parchment squares and small offset spatula or food-use flower lifter
- Petal tip with an approximately 1 cm slot, 2 mm round tip and small leaf tip
- 1,100 g prepared egg-free piping buttercream; food-grade black, burgundy, green and brown gel colors
Keep the tall silhouette within a manageable structure
Use three level 15 cm layers and two modest buttercream fillings for a final height around 10–11 cm. Choose a firm layer cake rather than a fragile soaked sponge, and avoid loose filling that can squeeze out. This is one cylinder, with no second tier, shell borders or crown of candles. Height should come from straight sides and careful proportion, not from piling on extra layers.
Anchor the cake to a rigid board at least 20 cm across and stack while the layers are cool. If the cake leans, slides or bulges before decorating, dismantle and correct the assembly. Frosting is not structural reinforcement. For a substantially taller double-barrel cake, follow a proven system with a food-contact intermediate board and supports under that board; a central rod alone does not carry the weight. Simplify the height when that support work is unfamiliar.
Set aside frosting for coating, flowers and vines
Allow 1,100 g prepared egg-free piping buttercream: 180 g kept in its original flavor and color for filling, 150 g dark for the crumb coat, 350 g black for the outer coat, 330 g burgundy for roses and practice, 60 g gray-green for vines and leaves, and 30 g black for repairs and flower attachment. This allowance suits small flowers; it is a decorating estimate, not a cake or frosting recipe.
Use frosting that can hold a petal edge. Start with prepared chocolate piping buttercream for the dark coating if its flavor suits your cake, then deepen it with food-grade black gel within label directions. A dark base needs less coloring than white frosting. Do not use activated charcoal or craft pigments. Let the shade develop before adding more gel; a near-black charcoal finish is acceptable. Tell guests that deep coloring can stain tongues and serving cloths.
Keep the burgundy portion firm enough that a thin petal holds its rim. Tint the green muted with a trace of brown, checking against the black base so it remains visible. Work out air pockets with a spatula rather than whipping more air into the bowls. Do not add raw eggs to purchased frosting.
Make small roses on parchment
Prepare five rim roses about 2.5–3 cm across and three side roses no more than about 2 cm across, plus a few spares. Stick a parchment square to the flower nail with a dot of frosting. Pipe a small central cone. Set the petal tip with its wide end against the cone and narrow edge upward, and turn the nail while wrapping a short petal around the center.
Add three overlapping curved petals around that center, then five slightly wider petals around the next ring. Keep the wide edge attached to the frosting base as the narrow edge forms the rim. Lower the narrow edge slightly for the outer petals. Side roses need a shallow cone and few outer petals so their backs remain broad and relatively flat. This basic petal construction is supported by Wilton’s buttercream rose instructions (https://blog.wilton.com/buttercream-roses/); the small sizes and arrangement here are original.
Slide each parchment square off the nail onto a tray. Chill or briefly freeze until the roses lift without bending; roughly 15–20 minutes is a starting check, not a fixed setting time. Leave them on their paper until transfer. If petals sag, cool the frosting and try a smaller flower. If the rims crack, soften the frosting slightly and check the tip for dried icing before changing its composition.
Fill, smooth and map the vine
Spread about half the filling portion between the first two layers and the rest below the third. Keep filling thin and level. Apply the dark crumb coat and refrigerate around 20–30 minutes until firm. Cover with the black outer coat, keeping the scraper upright. Draw the top edge inward with a clean spatula and chill again.
Sketch a loose cluster along the rear and left top rim, with a vine descending diagonally down the front-left side. Leave much of the top and right side black. Make tiny guide marks for the three side roses, separated by several centimeters. The rim roses should sit on the top inside the edge; their weight should not hang out over the side.
Pipe fine vines and small lobed leaves
With the 2 mm round tip, lay a gently curving gray-green line close against the chilled cake. Add a few short branching lines rather than a dense net. Work from the upper cluster downwards and stop squeezing before lifting the tip. A continuous unsupported rope will sag, so keep the nozzle near the surface and allow the frosting to adhere.
To suggest a lobed leaf without fresh foliage, use the small round tip to pipe three tiny connected teardrop dabs: one pointing away from the branch and two shorter angled dabs beside its base. Press each dab outward slightly with a clean small spatula if needed. Keep the whole leaf under 1 cm. Alternate leaf direction and leave gaps between groups. A leaf tip can make simple tapered leaves among the lobed ones. Reserve empty patches where roses will attach.
Transfer the rim roses and attach the side flowers
Lift a firm rose with a small spatula, peel off its parchment completely and place it onto a small frosting dot on the top. Work from the farthest rose toward you to avoid brushing petals. Put most rim flowers on the top surface, not balanced on its vertical edge. Add a few small leaves between them only after their placement is settled.
Test the smallest side rose first. Put a pea-sized black frosting pad on its reserved spot, position the flat back of the chilled flower against it, and hold gently with the lifter until it adheres. Keep the petals clear of your fingers. Chill and check that it stays in place before adding the others. Large, deep side roses can slide or pull off the outer coat; if one shifts, remove it, repair the coat and use a smaller flatter flower. Do not add hidden toothpicks, florist wire or stems as anchors.
If your frosting cannot hold transferred side flowers, pipe low burgundy spirals directly against the side with a small open-star tip. Start with a center star and make one close outward spiral, stopping pressure before lifting. This changes the flower style but retains the red-rose-and-vine composition without heavy ornaments.
Repair a dark coat and protect it in transit
For an attachment scar, chill first, scrape off loose frosting locally and patch with the reserved black portion. Smooth that small area before replacing the flower. If vines bleed or leaves smear, the surface may be damp; let condensation dry in a cool room before touching it again. Avoid spraying water on the dark coat to polish it.
Use a plain light-colored plate or board and soft side lighting for presentation. Box the cake with generous clearance around side roses. Transport it chilled, level and on a nonslip surface; a hot car quickly softens both flowers and their attachment pads. Carry the board rather than touching the cake. Bring a small covered repair portion if serving away from home.
Make ahead, store and slice
For quality, make flowers the day before assembly and keep covered on their tray in the refrigerator. Decorate within 1–2 days of serving, following the shortest storage limit of the cake, filling and frosting. Cover the whole cake with a tall box or container rather than cling film touching the flowers. Keep it away from strong-smelling foods.
Keep refrigerated at 4°C or colder. For perishable components, keep total time out within two hours, or one hour above 32°C, following FDA guidance (https://www.fda.gov/food/buy-store-serve-safe-food/refrigerator-thermometers-cold-facts-about-food-safety). Soften only the needed servings briefly in a cool room. Use a clean knife and wipe between cuts; black frosting easily marks pale crumb and the serving plate. Cut around side flowers when possible and refrigerate remaining portions promptly.
Original interpretation and source
Design inspiration: https://www.pinterest.com/pin/1095852521859729926/ . Buttercream roses and piped vines are the edible method proposed here, rather than an identification of the creator’s flower materials. The concept cover was generated independently.
The little details
- Keep side flowers smaller and flatter than top flowers.
- Remove every parchment square before placing its flower on the cake.
- A few clear branches are easier to pipe and photograph than dense greenery.
- Check the smallest flower attachment before committing to the whole side arrangement.
Your questions, answered
Are the source roses fresh or sugar flowers?
The supplied description cannot establish their material. This original guide uses edible buttercream roses. It does not identify the source baker’s flowers or reproduce their method.
Can I use a lower cake?
Yes. Two layers and a shorter cylinder are easier to handle. Use fewer side roses, shorten the vine and reduce filling and coating as needed. Keep enough burgundy frosting for practice flowers.
How can I get black frosting without too much dye?
Start with a prepared dark chocolate piping buttercream and add food-grade black gel gradually within its directions. Rest and judge a smear in daylight. Accept a deep charcoal shade rather than compromising flavor or texture with excessive coloring.
Can I put real vines or wired roses on it?
Use the piped edible vines and frosting flowers described here. Florist stems, unidentified leaves, wire and hidden picks are not interchangeable with edible decorations. A photograph cannot prove plant safety or food-contact suitability.
Made it? Let’s talk.
Share how your bake went, ask a question, or pass on a helpful tip. There’s a seat for you here.
A kind kitchen is a happy kitchen. Our community guidelines →
No comments yet. Be the first to say hello.