 0 comments
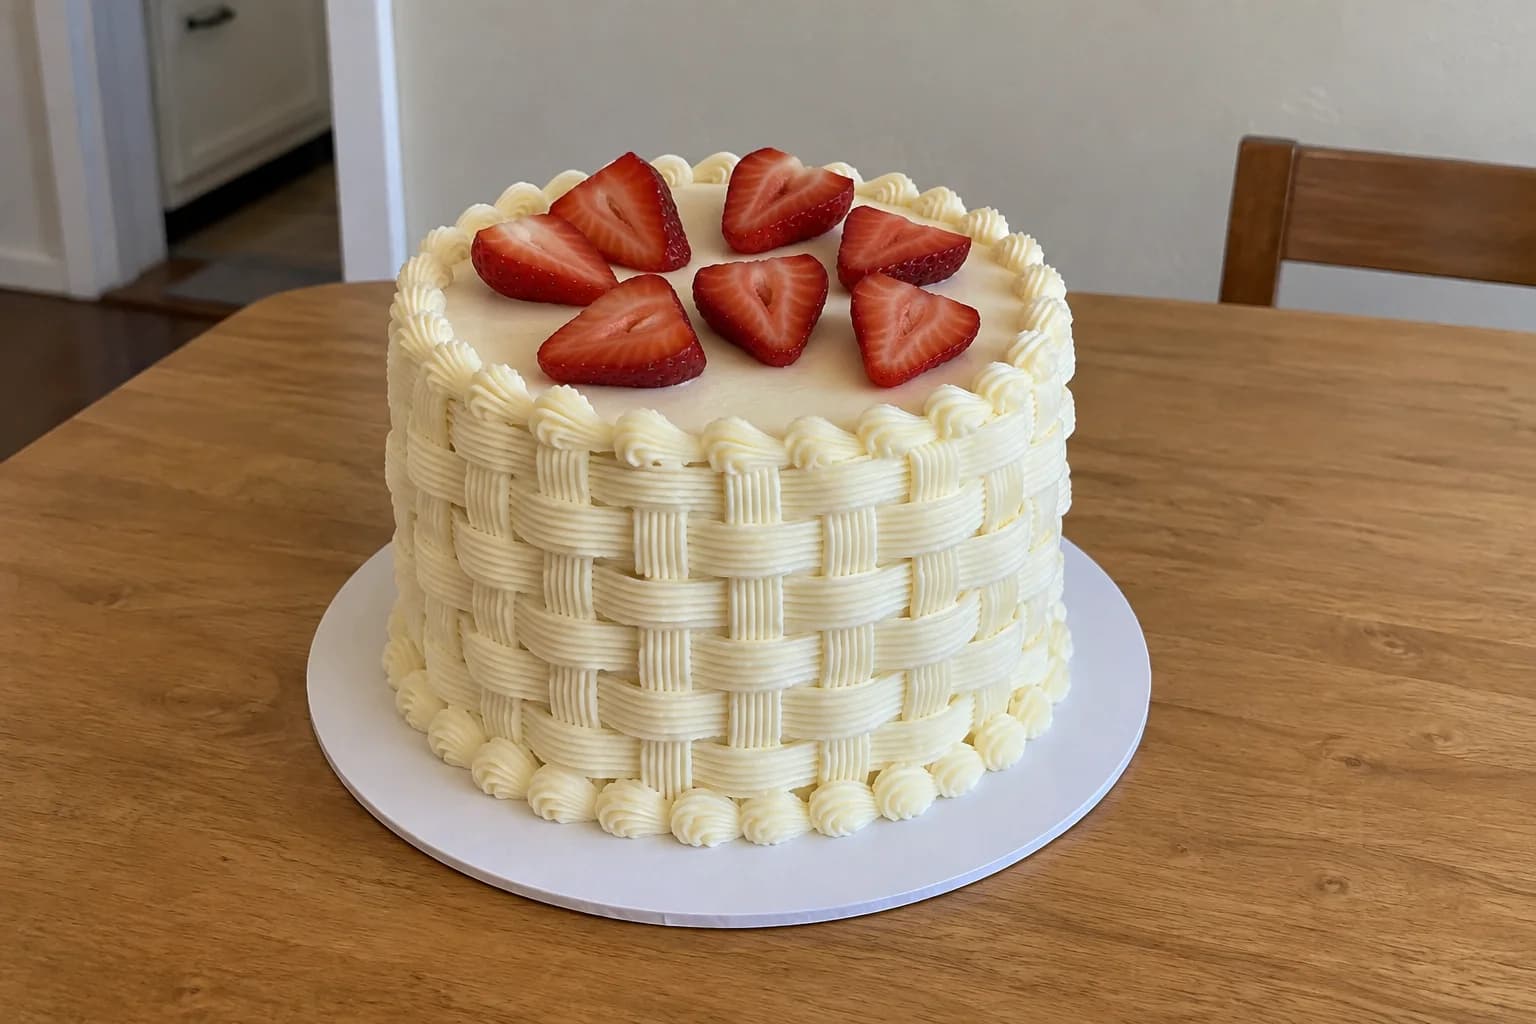
The woven effect on a basketweave cake comes from alternating short horizontal strips over vertical lines of buttercream. You do not need to weave anything after piping. This guide breaks the pattern into repeatable columns, then finishes the cake with strawberry halves and small shell borders. The vanilla frosting formula is an original, untested starting point; try a small practice panel to check texture and spacing.
Before you start
- Two baked, cooled 6-inch / 15-cm cake layers, filled to approximately 4 inches / 10 cm tall
- Wilton 47 basketweave tip, a standard coupler and 12-inch piping bags
- Wilton 21 open-star tip for the finishing shell borders
- Scale, mixer, spatula and scraper
- Cake board, turntable if available, and toothpick
- Parchment or a flat practice surface; small ruler
- Four firm strawberries, washed and dried before hulling and halving
Build a firm base in the same colour
Start with cake layers you have already baked and cooled. Fill and stack them, then apply a thin crumb coat. Refrigerate until the frosting is firm and add a thin, reasonably level outer coat in the same ivory shade. Matching colours keep the small gaps between the woven strips unobtrusive.
The frosting recipe below makes roughly 1.05 kg. For a 6-inch cake about 4 inches high, allow around 180 g for filling, 220 g for the crumb and outer coats, 500 g for the weave and 120 g for borders. Keep the small remainder for practice. These are working allocations, not guaranteed coverage for every nozzle opening or cake height.
Understand what tip 47 does
A basketweave tip has a flattened opening with teeth along one side. Point the ridged side outward so the lines show on the exposed strips. Pipe a short sample to identify which orientation produces the visible texture before starting on the cake.
Set the cake at a comfortable height so you can see whether the columns are vertical. The frosting should form a continuous strip without ragged breaks, but should not sag under its own weight. Begin with medium piping consistency and make small adjustments to a test portion.
Practice the alternating pattern on a small panel
Pipe one vertical line. Cross it with short horizontal strips, leaving a gap about one strip-width high between them. Pipe the next vertical line over the ends of those strips. In the gaps, start a fresh horizontal strip beside the previous column and carry it across the new vertical line.
Repeat this alternating arrangement: vertical line, then the set of horizontal strips that fills the previous gaps. The apparent over-and-under effect comes from the order in which frosting is laid down. You never need to lift one strip to thread another beneath it. Practice three or four columns before moving to the cake.
Take the pattern around the cake
Start at the back and mark a light vertical guide if it helps. Keep each strip close enough to the surface to attach, without dragging the metal nozzle through the frosting. Turn the cake after each column so you continue working directly in front of yourself.
Use the width of your own piped strips as the spacing reference. Exact millimetres are less useful than consistent proportions because different tips and pressure produce different widths. Pause every few columns and look straight at the cake: if the columns are leaning, correct the next guide before the drift becomes obvious.
Plan the seam before the last column
When you are a few columns away from the starting point, check the remaining gap. Make small width adjustments across those last columns instead of trying to force one very narrow final column. Keep the seam at the back where the starting vertical line can meet the finish.
Pipe a modest shell border at the base and around the top rim using tip 21. These borders cover the ends of the weave and give the cake a deliberate finish. They should frame the pattern rather than bury several rows beneath a thick ring.
Add the strawberry finish near serving time
Choose firm strawberries, wash and dry them before removing the green tops, then halve them. Blot the cut faces gently with clean kitchen paper. Place seven or eight halves inside the top border with a little space between them so the smooth top remains visible.
Fresh cut fruit can release moisture into frosting. Add it close to serving time and keep the decorated cake refrigerated. The image is a styling illustration; use the fruit size you have and avoid pressing berries into the piped rim. No basket handle or non-edible supports are needed for this design.
Troubleshoot the weave
If it looks like a ladder, check the alternating rows: every new set of horizontal strips should occupy the gaps in the previous set. If all strips start at the same height on every column, the woven illusion disappears.
If the strips tear, check for a dry or cold mixture and dried icing lodged in the tip. If the ridges melt together, pause and check the frosting temperature. Keep the tip covered when taking a break so crusted buttercream does not block the opening. Repair a small section after chilling it rather than smearing it while soft.
Make-ahead plan and references
The plain buttercream weave can be completed the day before serving and kept covered in the refrigerator. Add the cut strawberries on the serving day. Follow the shortest storage guidance required by the chosen cake or filling; this article does not extend the safe life of a perishable filling.
Tip 47, matching base colour and the alternating technique were cross-checked against Wilton’s Buttercream Basketweave Technique: https://www.youtube.com/watch?v=ZGMrI3wIPdY . For another demonstration see How to Pipe a Buttercream Basketweave Cake Design: https://www.youtube.com/watch?v=ww0xFkfTBOA . The layout, quantities and strawberry finish here are Kumora’s own plan.
Vanilla Piping Buttercream for a Basketweave Cake
- Makes, at 1×
- Approximately 1.05 kg for a small decorated cake
- Prep
- 20 min
- Baking
- 0 min
- Start to finish
- About 20 min
Buttercream preparation only. Cake baking, cooling, chilling and decorating take additional time.
Original recipe draft · not yet kitchen-tested. Baking times are estimates; use the doneness checks in the method.
Ingredients
Piping buttercream
Let’s make it
- Beat the softened butter until smooth. Mix in the sifted icing sugar in several additions on low speed, starting with 25 ml of the measured milk.
- Add vanilla and salt. Scrape the bowl and mix until the frosting is even. Add more of the measured milk only if needed to pipe an unbroken strip through tip 47.
- Stir slowly by hand to remove large air pockets. Keep the frosting ivory and divide into portions for filling, base coating, weaving and borders.
- Fill the tip-47 bag about halfway. Pipe a small three-column basketweave sample on parchment and check that the raised strips retain their texture.
- Once the sample holds, decorate the chilled coated cake using the sequence in the article. Keep the reserved border portion covered until you change to tip 21.
Original Kumora frosting formula, not kitchen-tested. Adjust using the piping test before decorating. Contains milk. This recipe is for buttercream, not cake batter. Cake layers and strawberry garnish are prepared separately. Use a tested cake recipe for the layers and refrigerate the finished cake according to its filling and fruit.
The little details
- Keep the first column at the back so the final join is less visible.
- Use a matching crumb-coat colour; a chocolate base under ivory weave makes every gap obvious.
- Check the direction of the teeth on tip 47 before filling the bag.
Your questions, answered
Which tip is used for buttercream basketweave?
This guide uses a Wilton 47 basketweave tip for the woven sides and a Wilton 21 open-star tip for the small finishing borders.
Do I physically weave the buttercream strips?
No. The effect is created by piping vertical lines and alternating horizontal strips in sequence. Trying to lift piped strips will damage them.
Can I put strawberries on the cake the night before?
For this design, add halved strawberries near serving time. Cut fruit can release juice and soften or stain the frosting during storage.
Why does my basketweave look like straight stripes?
Check whether the horizontal strips alternate into the gaps of the previous column. Repeating the same row positions in every column produces a different pattern.
Made it? Let’s talk.
Share how your bake went, ask a question, or pass on a helpful tip. There’s a seat for you here.
A kind kitchen is a happy kitchen. Our community guidelines →
No comments yet. Be the first to say hello.