 0 comments
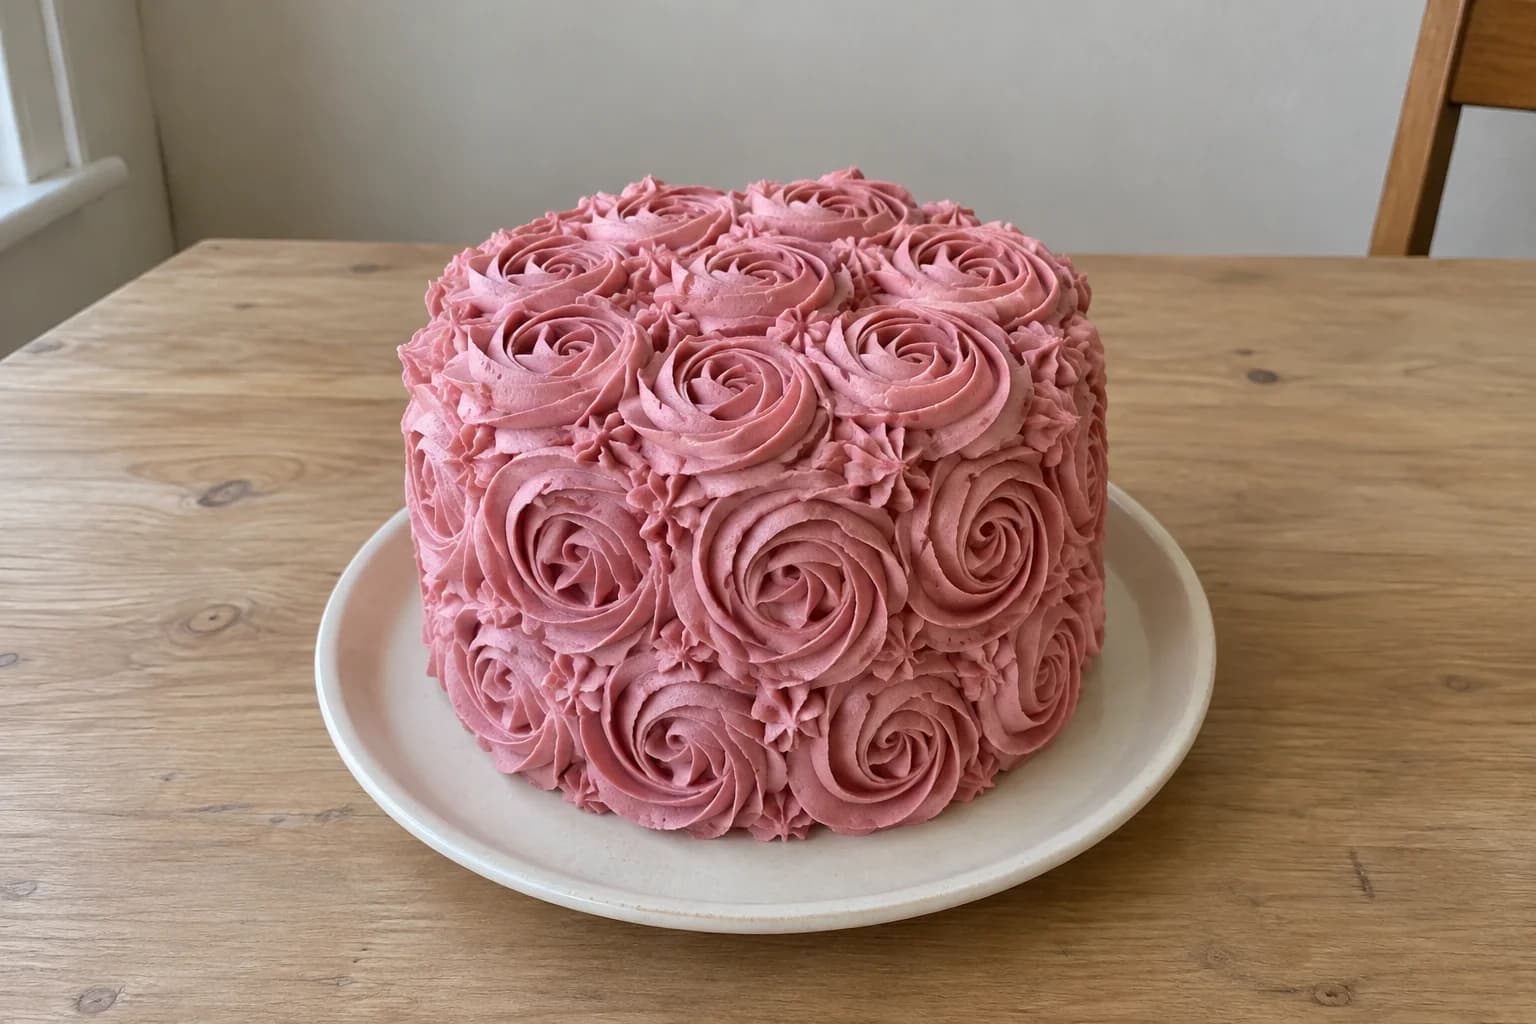
A rosette cake is built from repeated spirals, so one open-star piping tip can cover the top and sides. This guide uses dusty pink buttercream on a small round cake and explains where to start, how to keep the rows aligned and what to do when the last rosette does not fit. The frosting formula is original and has not been kitchen-tested; check a few practice rosettes before piping the cake.
Before you start
- Two baked, cooled 6-inch / 15-cm cake layers, filled to make a cake roughly 4 inches / 10 cm tall
- Wilton 1M open-star tip and sturdy 14- or 16-inch piping bags; a standard small coupler will not fit this large tip
- Cake board at least 8 inches / 20 cm across and optional turntable
- Scale, mixer, mixing bowls and flexible spatula
- Offset spatula, scraper and toothpick for marking guides
- Food-grade pink gel colouring and parchment for practice
Choose the cake size and allow enough frosting
This design covers the entire cake, so it uses considerably more frosting than a smooth finish with a border. The formula below makes roughly 1.35 kg. As a starting allocation, reserve 180 g for filling, 180 g for the crumb coat and about 950 g for rosettes; keep the remainder for testing and repairs. Actual usage depends on the depth of your spirals.
Use baked cake layers from an established recipe and cool them completely. Stack to about 4 inches tall including filling. A taller cake may need a third side row and more frosting, so do not assume the same batch will cover every cake described as 6-inch.
Make one consistent shade of pink
Colour the full batch before dividing it. Add a small amount of food-grade pink gel, stir thoroughly and check a thin smear against a white plate. Let the colour settle briefly before adding more; heavily coloured frosting can look much darker in the bowl than in a thin layer.
Use the same pink for the crumb coat and the rosettes. Small openings between flowers then look less obvious. The illustration uses a muted pink, but exact gel quantities vary too much by brand to promise a universal drop count. Keep a little uncoloured frosting aside if you want a way to soften the colour.
Prepare a stable, lightly chilled base
Stack and fill the cooled layers. Spread a thin pink crumb coat over the cake, then chill until it feels firm, not frozen. A level top and straight sides help the rosette rows sit evenly even though the final finish does not need a perfectly polished base.
Mark a few tiny dots around the cake with a toothpick to show where the two side rows should sit. For a cake approximately 4 inches high, aim for rosettes around 1.75 to 2 inches across and stagger the upper row into the gaps of the lower one. Practice a rosette at that size before spacing the guide dots.
The 1M rosette movement
On a flat practice surface, point the bag straight toward the surface and begin with a small star at the centre. With steady pressure, circle outward around that centre in one close spiral. Ease pressure and stop squeezing before lifting away so the finish blends into the outer curve.
For the cake sides, point the nozzle perpendicular to the side rather than vertically downward. Start at the back on the bottom row, then rotate the cake in short stages. Keep each centre at about the same height and use the same spiral direction throughout.
Build the side rows, then finish the top
Complete the bottom ring of rosettes first. Leave a small space between the thickest parts of adjacent spirals so you do not crush one while making the next. Look ahead a few rosettes before the join and adjust their widths slightly to meet the starting point.
Place the second row above the first, with the centres shifted so the flowers nest into the spaces below. On top, pipe an outer ring and then fill toward the centre. Use the same size where space permits; a smaller final rosette is neater than forcing a full-sized spiral into a narrow opening.
Small gaps and tails are repairable
For a tiny gap, use the same 1M tip to pipe a short star dab in matching frosting. Keep these dabs lower than the rosettes so they read as background texture. If the gaps are large, revise the spacing before adding another row; filling them all with tall stars makes the cake look crowded.
A long tail usually means pressure continued while the nozzle was lifting away. Practice stopping first. If a rosette slides or droops, check whether the base or piping bag is warm. Pause, chill as needed and retest. Do not keep layering fresh frosting over a slipping decoration.
Transport, serving and making ahead
Refrigerate the cake until the rosettes are firm enough to handle nearby without smearing them, then transport it level in a box with clearance above the highest frosting. Hold the board, not the frosting-covered sides. Avoid leaving the cake in sunlight or a warm vehicle.
Choose the serving schedule from the cake and filling recipe, using the shortest storage limit. For this plan, decorate within 1 to 2 days of serving and keep covered in the refrigerator. Any fresh cream or cream-cheese filling still needs its own refrigeration rules even though the outer frosting is buttercream.
Technique references
The open-star rosette motion and the suitability of tip 1M were checked against Wilton’s How to Pipe a Rosette: https://wilton.com/how-to-pipe-a-rosette/wlblogrecip-23128/ . The cake plan, colour approach and frosting quantities are original to Kumora.
The cover is an AI-generated illustration of the design. Expect handmade variation in your own spirals; the useful checks are whether they hold their shape, stay attached and fit the planned rows.
Vanilla Buttercream for a Pink Rosette Cake
- Makes, at 1×
- Approximately 1.35 kg for a small fully piped cake
- Prep
- 20 min
- Baking
- 0 min
- Start to finish
- About 20 min
Buttercream preparation only. Cake baking, cooling, chilling and decorating take additional time.
Original recipe draft · not yet kitchen-tested. Baking times are estimates; use the doneness checks in the method.
Ingredients
Piping buttercream
Let’s make it
- Beat the softened butter until smooth. Add sifted icing sugar in several additions on low speed, using 35 ml of the measured milk to help combine it.
- Add vanilla and salt. Scrape the bowl and mix until even. Use the remaining milk only as needed for a frosting that flows through a 1M tip and retains its ridges.
- Stir in a very small amount of pink gel and check a smear against a white plate. Adjust gradually, colouring the main batch before dividing it for filling, coating and piping.
- Stir with a spatula to remove large air pockets. Fill the piping bag no more than halfway so it is comfortable to control.
- Pipe a few rosettes on parchment. Allow them to sit briefly, then check that the spiral stays defined and does not slump. Reserve the portions described in the guide and decorate only completely cooled cake.
Original Kumora frosting formula, not kitchen-tested. Adjust using the piping test before decorating. Contains milk. This recipe makes decorating frosting only; use your own baked and cooled cake layers. Gel colouring strength varies, so the listed dab is a starting point rather than a precise universal measurement.
The little details
- Colour enough frosting for the entire cake at once; matching a second bowl of dusty pink can be difficult.
- Use short sessions and smaller bag fills if your hand warms the frosting quickly.
- The 1M is an open-star tip; a 2D closed-star tip gives a different petal effect.
Your questions, answered
Which piping tip makes a rosette cake?
This guide uses a Wilton 1M open-star tip for medium-sized spirals. It is larger than a standard small tip, so use a suitable bag opening or large coupler.
Can I make every decoration with one tip?
Yes. The rosettes and the small star dabs used to fill gaps can both be piped with the same 1M tip.
Why are my buttercream rosettes sliding?
Possible causes include a warm or soft crumb coat, warm frosting in the bag, very loose buttercream or a heavy spiral with poor contact. Cool the affected components and test before continuing.
How much frosting does a 6-inch rosette cake need?
This plan provides roughly 1.35 kg for filling, a crumb coat and full rosette coverage of a cake around 4 inches tall. Treat it as an allowance: tall cakes and deep spirals require more.
Made it? Let’s talk.
Share how your bake went, ask a question, or pass on a helpful tip. There’s a seat for you here.
A kind kitchen is a happy kitchen. Our community guidelines →
No comments yet. Be the first to say hello.