 0 comments
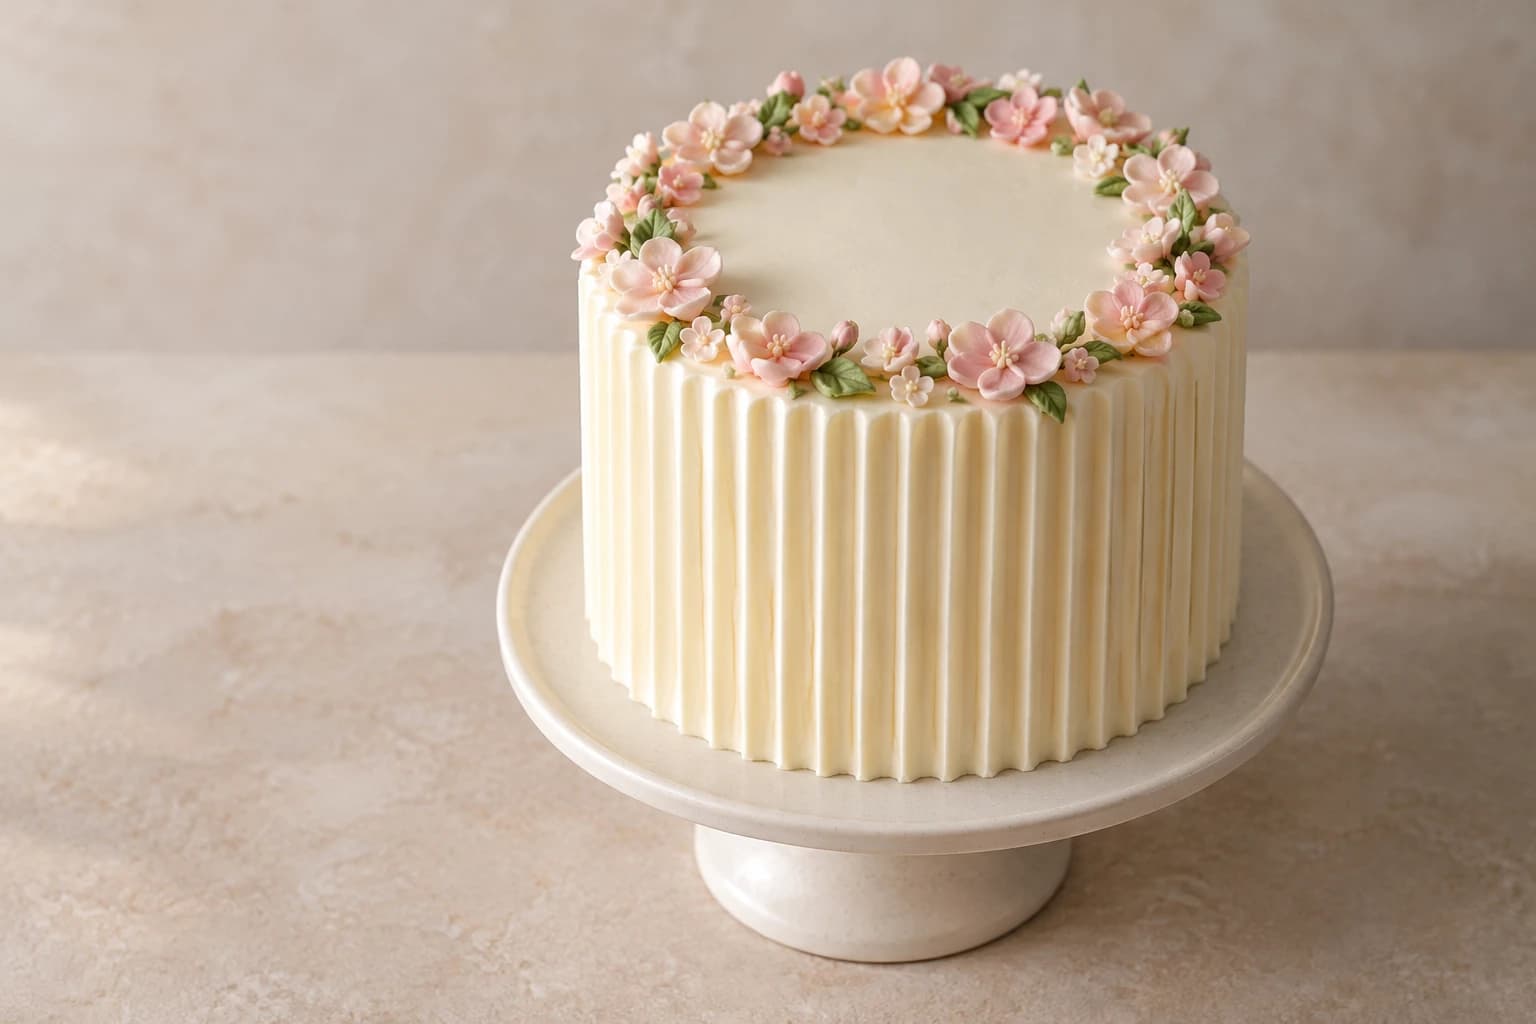
Fine vertical ridges give this ivory cake height, while a light ring of small pink flowers frames an open center. The original interpretation here uses narrow vertical buttercream piping and edible blossoms, replacing the dried-looking branching decorations in the reference with a food-safe crown. This is Kumora’s original interpretation of a Pinterest design, not the pictured baker’s recipe or method. The reference remains credited to its original creator.
An original Kumora recipe inspired by the linked cake design. The linked reference is decorating inspiration, not evidence of a kitchen-tested result from this recipe. The cover is identified in its caption.
Before you start
- Three cooled 15 cm round cake layers, about 3 cm high
- 1,000 g prepared ivory piping buttercream; 60 g pink and 15 g green buttercream
- Piping bag with a narrow flat or basketweave tip about 4–5 mm wide
- Tall straight scraper, small offset spatula, turntable and 20 cm board
- Small petal and round piping tips, parchment squares
- Optional labeled edible sugar blossoms with no wire or stems
Choose height and reserve enough coating
A single cake about 10 cm high is sufficient; this is not a stacked tier guide. Use level sturdy layers and modest buttercream fillings. Split 1,000 g ivory frosting into 240 g for two seams, 150 g for the crumb coat, 300 g for a smooth base coat, 230 g for vertical pleats and 80 g for rim and repairs. Keep the separate 60 g pink and 15 g green portions for small blossoms and leaves. These are planning quantities including practice and bag residue.
Use a narrow flat or basketweave piping tip about 4–5 mm wide, with its smooth face outward if it has a serrated face. Straight upright strips laid side by side create the fine pleated effect. This is an achievable interpretation of the visible texture, not a claim about the source baker’s tool. A toothed side scraper rotated around the cake creates horizontal rings and should not be used for these vertical pleats.
Prepare a stable, straight base
Fix the first layer to its board, fill each seam with roughly 120 g ivory frosting and stack carefully. Check the side with a straight scraper and correct a leaning layer now. Crumb-coat thinly, fill shallow dents and chill 20–30 minutes. Tall visible ridges exaggerate leaning, so level construction matters more than elaborate flowers.
Spread the final smooth ivory base coat around the sides and over the top, keeping it only a few millimeters thick. Scrape gently and chill until a light touch does not lift it. The firm canvas lets each new pleat attach without dragging the base. Keep the separate 230 g pleat portion soft enough to extrude in an unbroken strip but firm enough to hold its narrow edges.
Pipe fine vertical pleats in small groups
Practice on parchment held against a clean upright board at cake height. Hold the flat tip close to the surface, with its wide opening horizontal and smooth face outward. Start at the lower edge, squeeze steadily and move straight upward, stopping pressure at the top before lifting away. A strip about 4–5 mm wide is enough. This is a straight strip, not a side-to-side ruffle.
On the chilled cake, start at the rear seam. Pipe one strip bottom to top, then rotate only enough to place the next strip immediately beside it, overlapping edges very slightly so the ivory base does not show as a gap. Work in groups of five to ten strips and pause to check vertical alignment. Keep the bag only partly full to reduce hand fatigue.
At the upper edge, leave short ends that can be covered by the flower crown, or touch a raised tail inward with a clean small spatula after chilling. Do not scrape across finished pleats. At the rear closing seam, use a slightly narrower final strip if necessary rather than spreading every strip wider. Chill completed groups if the ridges soften.
Make a loose edible flower crown
Pipe twenty to thirty small pale pink blossoms on parchment: five short petal-tip strokes around a dot, each flower roughly 8–12 mm across. Add an ivory center and chill until transferable. Use little sugar blossoms instead if you prefer, checking that they are labeled edible and contain no wire. This crown should be low and light, not a dense bouquet.
Arrange flowers around the outer top rim in small uneven groups with visible gaps. Attach each with a dab of ivory buttercream and pipe tiny green leaves between selected groups. Keep all decoration within the top edge so it will not catch the box. Do not use dried florist stems, branching sprays or floral tape in or against the cake.
Troubleshoot texture and finish
If the strips tear or look rough, the piping frosting may be too cold or contain air pockets. Let it soften slightly and stir slowly, then test again on parchment. If strips sag, chill the bag briefly and keep the cake cold. Lift one failed strip after it firms, patch the base and pipe its replacement. Consistent upward motion and steady pressure are more useful than forcing the bag harder.
Take a look at eye level and from above before adding the last flowers. Remove an overcrowded cluster while the flowers are firm, patch with ivory frosting and leave more open rim. The plain center is deliberate. A separate card is easier to read than a long inscription forced into the narrow crown.
Presentation, transport and storage
Place the finished dessert on a clean food-safe board or plate and use a box with clearance above and beside every decoration. Chill before transport, support the board from underneath and keep it level on a nonslip surface in a cool vehicle. Avoid adding paper cards, fabric, wire or florist materials to the edible surface. The concept hero illustrates the intended look; it is not a photograph of a tested result.
Refrigerate covered at 4°C or colder. For best quality, plan to serve within 3 days, following any shorter limit on your cake, filling, frosting or decoration packaging. This is a conservative planning window, not a validated shelf-life claim. Keep leftovers covered and refrigerate promptly. Soften only the cake portions you will serve briefly in a cool room.
Keep perishable desserts out of refrigeration for no more than two hours in total, reduced to one hour above 32°C / 90°F; decorating, transport and display time count together. Use a clean knife and wipe it between portions. This temperature and time guidance follows the FDA’s safe storage advice (https://www.fda.gov/consumers/consumer-updates/are-you-storing-food-safely).
The little details
- Choose a narrow flat piping tip and practice one full-height upright strip.
- Keep the base coat firm and the pleat frosting pliable so strips attach cleanly.
- Dry-looking flowers in a reference are not evidence that florist flowers are safe.
Your questions, answered
Can I use a cake comb instead?
A standard side comb moved around the cake makes horizontal grooves. The fine vertical interpretation here uses straight bottom-to-top piped strips with a narrow flat tip.
Can I decorate a shorter cake?
Yes. Shorter strips are easier to keep straight. Adjust the cake and coating quantities to the new height while keeping the blossom crown low and delicate.
When should sugar blossoms go on?
Follow their packaging. Moisture-sensitive blossoms can soften in refrigeration, so store them dry and attach near serving while keeping the cake cold.
Made it? Let’s talk.
Share how your bake went, ask a question, or pass on a helpful tip. There’s a seat for you here.
A kind kitchen is a happy kitchen. Our community guidelines →
No comments yet. Be the first to say hello.