 0 comments
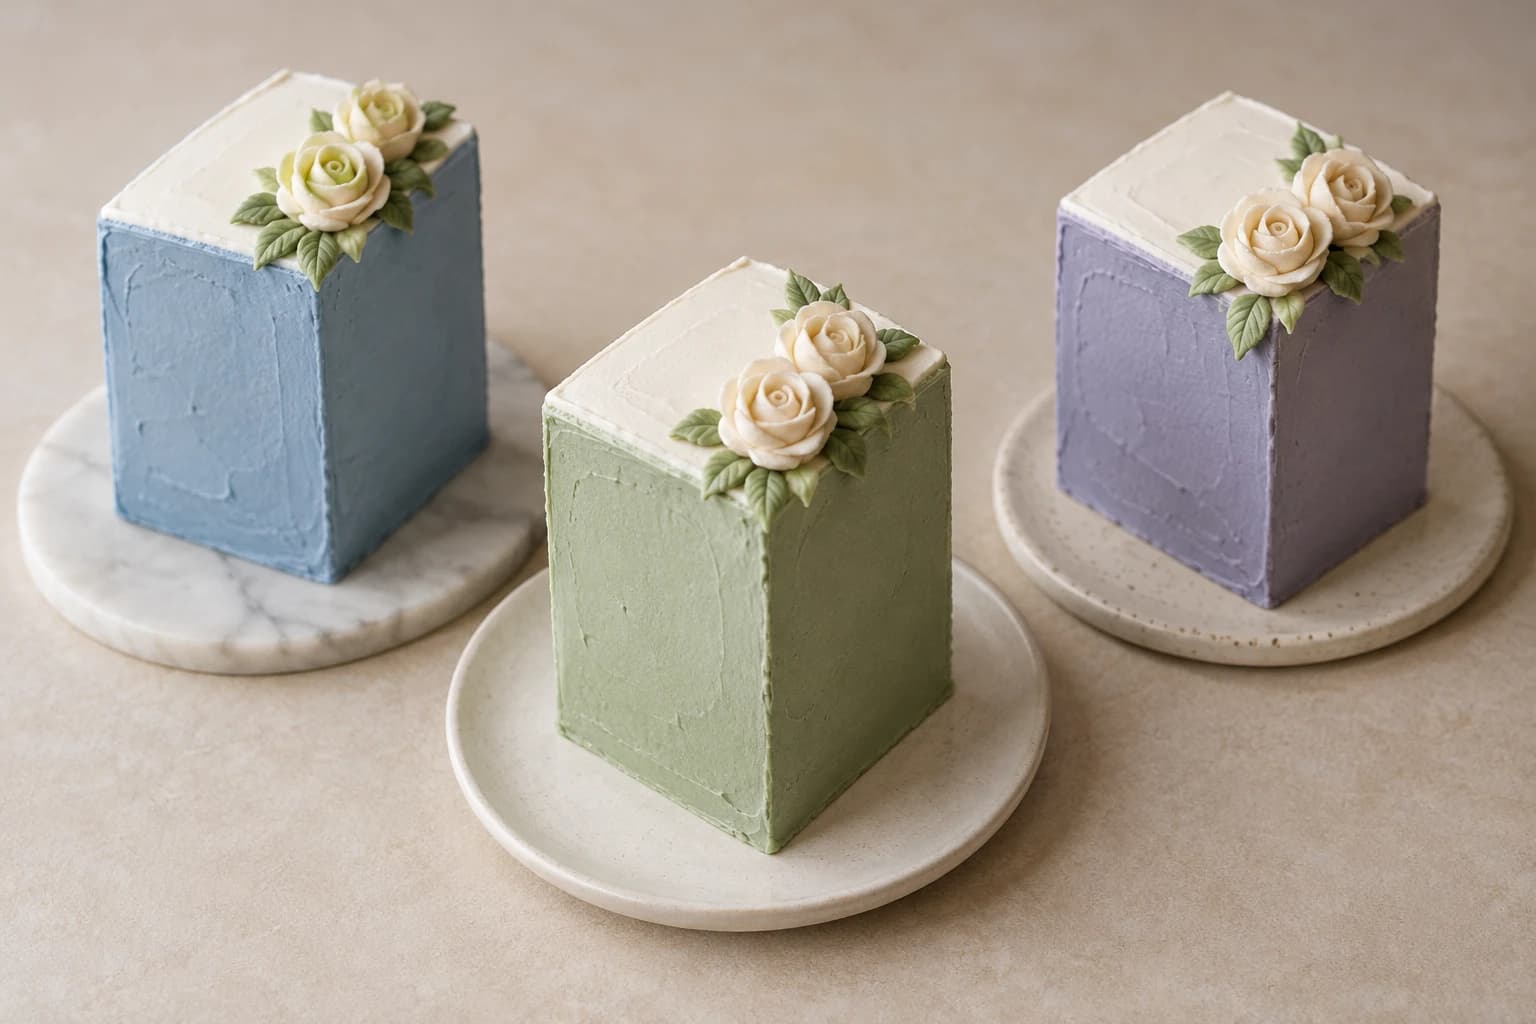
Three small rectangular cakes create a coordinated set without becoming a long celebration slab. Each block has its own pastel sides, a white top panel and a compact edible rose cluster at one corner. This original guide starts with baked sheet cake, focusing on even cutting, chilled corners and small-scale flower placement. This is Kumora’s original interpretation of a Pinterest design, not the pictured baker’s recipe or method. The reference remains credited to its original creator.
An original Kumora recipe inspired by the linked cake design. The linked reference is decorating inspiration, not evidence of a kitchen-tested result from this recipe. The cover is identified in its caption.
Before you start
- A cooled, level 24 × 15 cm sheet cake about 2 cm thick, from a trusted recipe
- 1,050 g prepared ivory piping buttercream; dusty blue, sage and lavender food-grade gels
- Ruler, serrated knife, scale, scraper and small offset spatula
- Three separate food-safe boards about 12 × 9 cm; flat tray and turntable
- Small petal tip, leaf tip, piping bags, flower nail and parchment squares
- Three boxes or one compartmented box with headroom
Cut nine matched rectangles, not one long slab
Mark the cooled 24 × 15 cm sheet into a three-by-three grid: three 8 cm lengths and three 5 cm widths. Cut nine 8 × 5 cm pieces with a serrated knife using a gentle sawing motion. Each mini cake uses three pieces stacked, giving a cake block about 6 cm high before filling and coating. Level before marking so the nine pieces have similar thickness.
If the baked sheet is smaller after trimming, use the largest even three-by-three grid that fits and accept smaller blocks; do not bridge pieces with frosting. A soft crumb may benefit from chilling before cutting. Lift slices with a wide spatula, not by pinching their corners. The source recipe is unknown; use a sheet cake sturdy enough for miniature layers.
Weigh a practical frosting budget
Reserve 1,050 g ivory piping buttercream as 180 g filling, 120 g crumb coats, 510 g pastel sides, 150 g white top panels, 60 g cream roses, 15 g green leaves and 15 g repairs. Split the 510 g side portion into three 170 g bowls and tint dusty blue, sage and slate lavender with food-grade gels. The final 15 g repair portion can be divided among the working colors if needed.
These amounts cover small three-layer blocks with modest flowers, including piping residue. Keep the ivory top and rose portions free of tinted spatulas. Prepare frosting at a consistency that spreads without tearing cake but firms under refrigeration. A fluid glaze or very soft whipped filling is unsuitable for crisp vertical sides and transfers.
Stack short blocks on individual boards
Secure the first rectangle of each cake with a small frosting dab. Spread about 30 g filling over it, add the next rectangle, repeat 30 g and add the third. This uses about 60 g filling per mini. Keep seams level and aligned; do not build a thick filling pillow that lets the top block drift. Check corners with the ruler held beside, not pressed into, the cake.
Apply roughly 40 g crumb coat per block, filling minor gaps and sealing crumbs. Refrigerate 25–30 minutes until firm. Keep all three boards on a flat tray with space between them so you can handle each board without touching frosting. A narrow cake can tip if carried by its top or squeezed between fingers.
Make pastel side panels and square corners
Work on one block at a time while the others stay cold. Apply its 170 g pastel portion in an even thin layer on four sides. Scrape each long side straight, then each short end, keeping the tool upright and sweeping toward the corner without pressing beyond it. Chill briefly before trimming ridges.
Square corners emerge from two flat faces meeting; they do not need an extra mound at the edge. Pull raised frosting inward across the top only after the sides are straight. Use a very small spatula for short end panels. If a corner rounds off, chill, add a little matching frosting to the two adjoining faces and re-scrape with short passes.
Add a white top panel and small cream roses
Spread about 50 g ivory frosting over each top, keeping it inside the pastel edge, and level with a small clean spatula. Chill to firm. For roses, pipe a small ivory cone on a parchment square on a flower nail, then wrap one petal around it with the wide tip edge at the base. Add three overlapping petals, then five around the next ring, keeping each rose about 1.5–2 cm wide.
Use the 60 g rose budget for six compact blooms plus practice. Chill until transferable and place two near a single corner of each block using tiny buttercream dabs. Pipe one or two small green leaves beneath the cluster, staying inside the top footprint. If petal roses are difficult, use two small open-star rosettes per block as a simpler edible alternative. No fresh florist flowers or wired decorations are needed.
Arrange, repair and slice the individual cakes
Place the three boards together with gaps so every cake reads as a separate gift-sized block. Do not join them with frosting or place a long floral bridge across them. The white panels should remain mostly clear; copy neither names nor branding from the reference. Individual cards can carry longer greetings outside the food-contact area.
If a layer slides or a side bows, return the block to the fridge, then realign before final decoration rather than masking it with a thick coat. If pale frosting picks up crumbs, the crumb coat was too soft or incomplete; chill and repair a panel with a clean reserved portion. Cut each block across its short dimension into two or three portions using a wiped knife, according to the sponge recipe’s yield and the portion size you want.
Presentation, transport and storage
Place the finished dessert on a clean food-safe board or plate and use a box with clearance above and beside every decoration. Chill before transport, support the board from underneath and keep it level on a nonslip surface in a cool vehicle. Avoid adding paper cards, fabric, wire or florist materials to the edible surface. The concept hero illustrates the intended look; it is not a photograph of a tested result.
Refrigerate covered at 4°C or colder. For best quality, plan to serve within 3 days, following any shorter limit on your cake, filling, frosting or decoration packaging. This is a conservative planning window, not a validated shelf-life claim. Keep leftovers covered and refrigerate promptly. Soften only the cake portions you will serve briefly in a cool room.
Keep perishable desserts out of refrigeration for no more than two hours in total, reduced to one hour above 32°C / 90°F; decorating, transport and display time count together. Use a clean knife and wipe it between portions. This temperature and time guidance follows the FDA’s safe storage advice (https://www.fda.gov/consumers/consumer-updates/are-you-storing-food-safely).
The little details
- Chill the sheet before cutting if the crumb is fragile.
- Handle each cake by its board, especially while corners are soft.
- Keep each rose cluster inside the small white top panel.
- Measure box headroom after the roses are attached.
Your questions, answered
Can I use a loaf cake instead of sheet cake?
Yes, if you can cut enough even 8 × 5 cm slices of equal thickness. The sheet method produces nine matching layers efficiently; avoid domed or tapered pieces in the stacks.
Are these parts of one long cake?
No. They are three separate short rectangular blocks on individual boards, each with its own pastel sides and white top.
Can I skip petal-tip roses?
Use compact open-star rosettes instead. Keep the cluster small and add a few edible piped leaves; the guide does not require florist flowers.
Made it? Let’s talk.
Share how your bake went, ask a question, or pass on a helpful tip. There’s a seat for you here.
A kind kitchen is a happy kitchen. Our community guidelines →
No comments yet. Be the first to say hello.