 0 comments
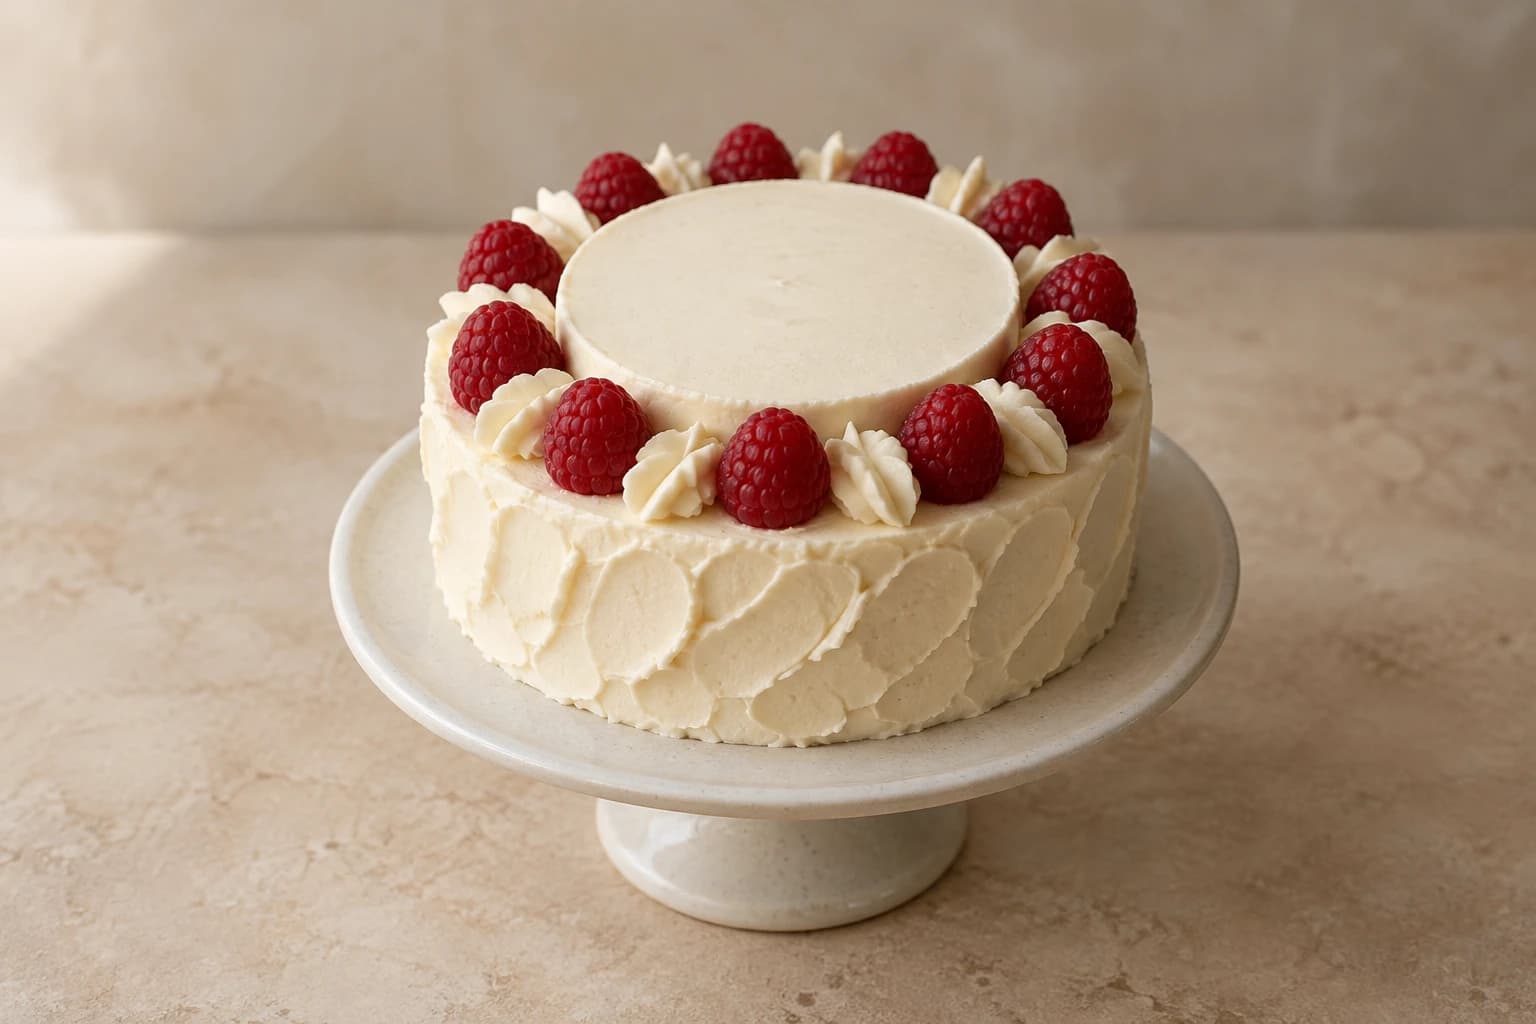
The raised center is a shallow cap, leaving an outer ledge for raspberries and ivory leaves. This original interpretation uses one low round cake and a small thin cake disk, avoiding the weight and support needs of a tall tiered construction. The berries sit around the cap rather than on a tower of frosting. This is Kumora’s original interpretation of a Pinterest design, not the pictured baker’s recipe or method. The reference remains credited to its original creator.
An original Kumora recipe inspired by the linked cake design. The linked reference is decorating inspiration, not evidence of a kitchen-tested result from this recipe. The cover is identified in its caption.
Before you start
- One cooled level 15 cm round cake, about 4–5 cm high
- One cooled 10 cm cake disk, no more than 1–1.5 cm thick
- 700 g prepared ivory piping buttercream; 120–150 g firm raspberries
- 20 cm board, scale, turntable, ruler and small offset spatula
- Straight scraper, small leaf tip and piping bag
- Sharp serrated knife and food-safe parchment template
Keep the center cap genuinely shallow
Use a 15 cm cake and a 10 cm disk to leave a 2.5 cm ledge all around. The disk must be only 1–1.5 cm high, not a second tall cake. Cut it from an already baked cooled layer with a clean food-safe template and a serrated knife. This guide begins after baking and does not infer the source sponge or filling.
Choose sturdy cake rather than a very airy fragile sponge. Keep the main cake unfilled for the simplest version, or follow a trusted recipe for its modest internal filling; extra filling frosting is separate from the coating budget below. The light cap is attached directly with frosting. A taller, heavier second cake needs a different support and construction plan and is outside this guide.
Divide frosting and coat both components
Reserve 700 g ivory piping buttercream as 90 g for the main crumb coat, 300 g final coating, 50 g cap attachment, 40 g cap crumb coat, 100 g cap finish, 80 g piped leaves and 40 g repairs. Use an icing that can hold a small leaf ridge. These are planning amounts; a wider or filled cake changes the budget.
Secure the main cake to its board, crumb-coat and chill 20–30 minutes. Coat the small disk separately on parchment on a flat tray and chill it until firm enough to lift. Smooth the disk top and sides with small short strokes. Coat the main cake and create restrained vertical spatula marks on its sides, leaving the top ledge fairly smooth so berries sit securely.
Center the cap without crushing the ledge
Place a 10 cm paper circle briefly above the cake to check the layout, then remove it before frosting contact. Measure or mark very lightly at four points so the ledge width stays consistent. Spread the 50 g attachment frosting as a thin even pad only where the cap will sit. Do not build a tall mound that changes the height.
Lift the chilled disk from parchment with a broad spatula supporting most of its base and lower it centrally. Slide the tool out gently. Press lightly through a clean flat tool only if needed for contact, then check the cap is level. Patch the join with a small smear of ivory. Chill the assembled cake 20 minutes before adding fruit. No hidden pins or florist supports belong beneath the cap.
Add raspberries and ivory leaves near serving
Select about eighteen to twenty-four similar firm berries; the exact count depends on size. Rinse gently shortly before use, drain and dry thoroughly without crushing. Discard moldy or leaking berries. Arrange them upright in a ring on the exposed ledge, with small gaps for leaves and without leaning against the cap so hard that they mark the frosting.
Use a tiny frosting dab under a berry if needed, rather than pushing it deeply into the ledge. Pipe short ivory leaves between selected berries: with the leaf tip opening oriented vertically, squeeze a wider base, draw outward a short distance and release to a point. Practice first. Keep leaves within the ledge and no more than about 1.5 cm long, so they remain clear of the box.
Repair the cap and portion the shape
If the cap tilts, remove it while cold, level the attachment pad and replace. Do not attempt to straighten it by piling berries under one edge. If a raspberry leaks, remove it promptly, blot the moisture gently and patch the frosting before placing a dry replacement. This is easier with a small reserve of clean ivory frosting.
Cut through the shallow disk and main cake together with a clean sharp knife, wiping between wedges. Arrange cutting lines between berries when possible. The cap changes the visual profile, not the need for cold storage: add the berries near serving and use the fruit-decorated cake promptly. Keep the center plain or place any message on a separate card rather than copying the reference’s lettering or card.
Presentation, transport and storage
Place the finished dessert on a clean food-safe board or plate and use a box with clearance above and beside every decoration. Chill before transport, support the board from underneath and keep it level on a nonslip surface in a cool vehicle. Avoid adding paper cards, fabric, wire or florist materials to the edible surface. The concept hero illustrates the intended look; it is not a photograph of a tested result.
Refrigerate covered at 4°C or colder. For best quality, plan to serve within 2 days, following any shorter limit on your cake, filling, frosting or decoration packaging. This is a conservative planning window, not a validated shelf-life claim. Keep leftovers covered and refrigerate promptly. Soften only the cake portions you will serve briefly in a cool room.
Keep perishable desserts out of refrigeration for no more than two hours in total, reduced to one hour above 32°C / 90°F; decorating, transport and display time count together. Use a clean knife and wipe it between portions. This temperature and time guidance follows the FDA’s safe storage advice (https://www.fda.gov/consumers/consumer-updates/are-you-storing-food-safely).
The little details
- A thin disk gives the raised center without a tall second tier.
- Measure the ledge at four points before attaching the cap.
- Keep washed berries dry and add them near serving.
Your questions, answered
Can I use a full-height 10 cm cake on top?
That is a different tiered construction requiring an appropriate board and supports. This guide is only for a light 1–1.5 cm shallow disk on a low cake.
Can I form the cap entirely from frosting?
A small flat frosting mound is possible but changes texture and can become very sweet or soft. The thin cake disk provides a defined level cap with less frosting.
Why are my raspberries bleeding color?
Wet, damaged or overripe berries release juice. Use firm dry fruit, add it near serving and replace leaking berries rather than burying them in frosting.
Made it? Let’s talk.
Share how your bake went, ask a question, or pass on a helpful tip. There’s a seat for you here.
A kind kitchen is a happy kitchen. Our community guidelines →
No comments yet. Be the first to say hello.