 0 comments
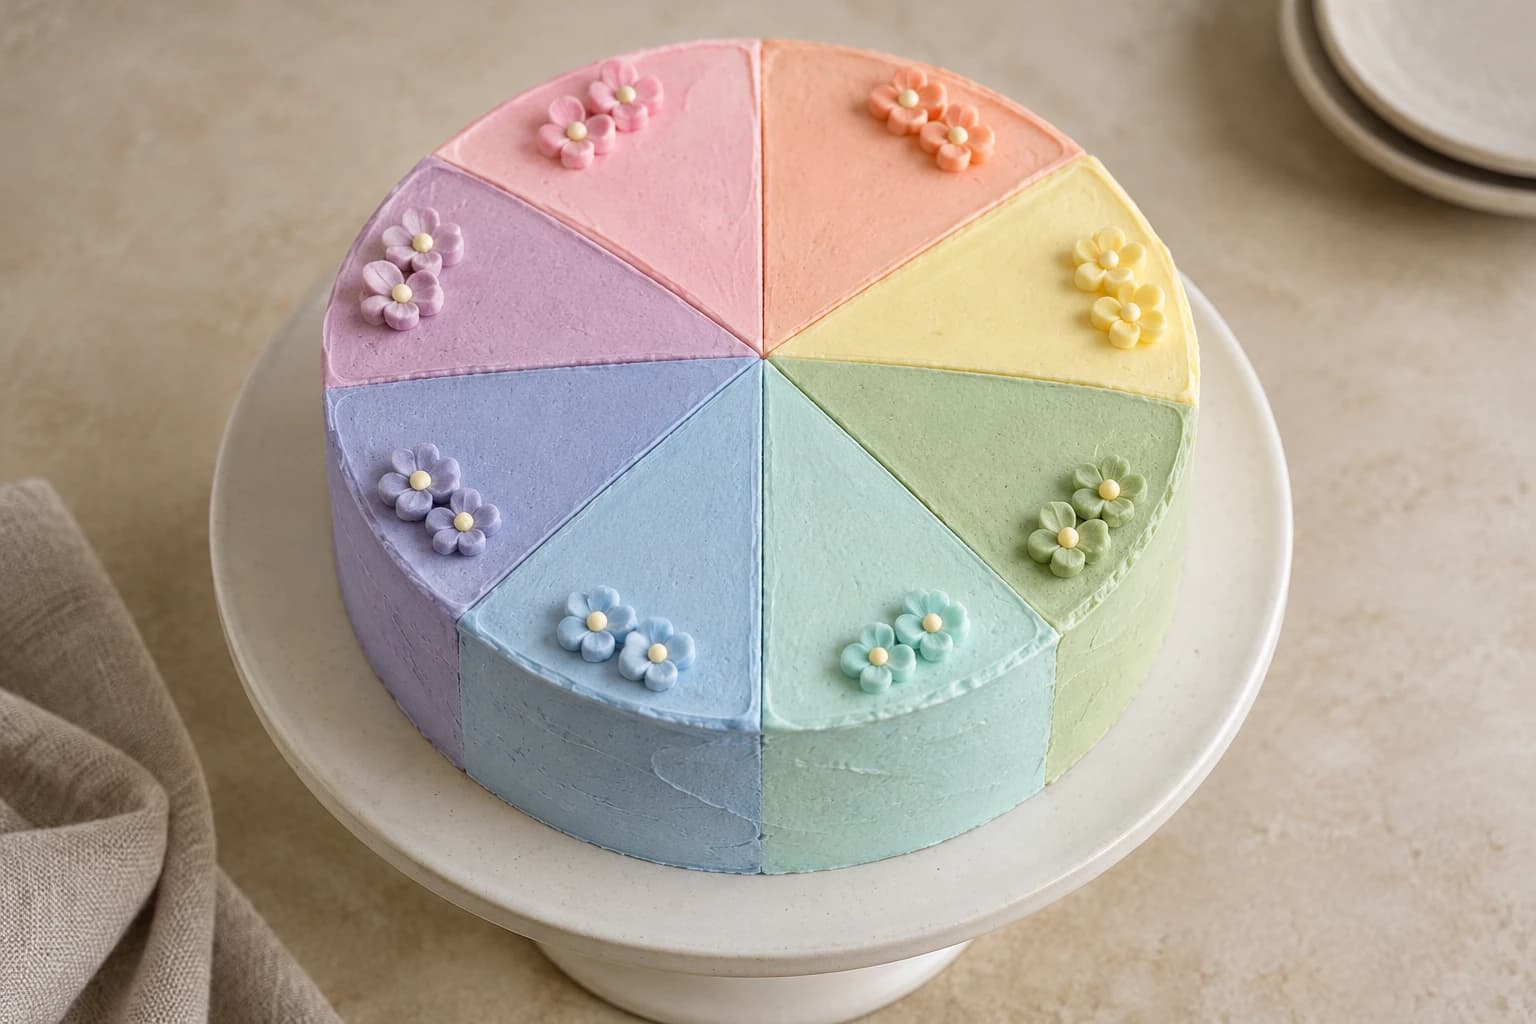
Eight celebrants need more precise layout than four broad quarters. This original guide marks eight 45-degree wedges, portions icing before coloring and places compact names and dates near the wider outer edge. Each sector can have its own color and small flowers while the sides remain quiet. This is Kumora’s original interpretation of a Pinterest design, not the pictured baker’s recipe or method. The reference remains credited to its original creator.
An original Kumora recipe inspired by the linked cake design. The linked reference is decorating inspiration, not evidence of a kitchen-tested result from this recipe. The cover is identified in its caption.
Before you start
- Two cooled 20 cm / 8-inch round cake layers, about 2.5–3 cm high
- 1,050 g prepared ivory piping buttercream; eight food-grade pastel gels
- Scale and eight small bowls; scraper, offset spatula and turntable
- 25 cm board, ruler, paper circle and protractor or folded template
- Eight small piping bags, 1–2 mm round writing tip and small flower tip
- Food-safe parchment strips and a clean sharp slicing knife
Allocate icing before adding eight colors
Use a 20 cm cake rather than a tiny bento so each wedge has useful writing room. Divide 1,050 g piping buttercream into 180 g filling, 130 g crumb coat, 280 g smooth sides and thin ivory top base, 360 g colored sector icing, 60 g dark or contrasting writing icing and 40 g flowers and repairs. Weigh the 360 g sector portion into eight 45 g bowls before coloring; bag residue is included.
Choose pale pink, peach, yellow, sage, aqua, powder blue, lavender and rose, or another clearly separated set. Mix gels gradually according to their labels. Darker writing icing should remain visible against every pastel. A very heavy colored top is harder to cut neatly, so aim for a 2–3 mm overlay rather than using excess icing to force large mounds into the center.
Measure eight equal 45-degree sectors
Draw a paper circle exactly 20 cm wide. Fold it in half, then quarters, then eighths; unfold and check that all eight edge points are equally spaced. Alternatively mark rays every 45 degrees with a protractor. The top circumference is roughly 62.8 cm, so adjacent edge marks are about 7.85 cm apart measured along the curve, not as straight chords. Use the template for accuracy rather than relying only on this estimate.
Fill and stack the cake, crumb-coat and chill. Smooth the sides and a thin ivory top base, then chill until firm. With the template held just above the surface, mark the center and eight rim positions lightly with a clean skewer, remove the paper and connect marks with shallow radial guides. Do not embed inked paper, a stencil edge or a ruler in the edible top.
Apply colors with clean boundaries
Work on alternating sectors first: positions one, three, five and seven. Pipe each color inside its radial guides, beginning at the wider rim and tapering toward the center. Spread gently with a small spatula. A clean narrow spatula or short food-safe parchment strip held upright at the boundary can act as a temporary fence; remove it immediately after smoothing.
Chill until these sectors are firm enough that neighboring icing will not drag them. Complete positions two, four, six and eight, cleaning the spatula between colors. Keep every temporary parchment piece above the base and remove all pieces. Do not hide paper beneath icing. For a mixed center, chill and scrape only the tiny crossing point, then patch. A single small flower can cover the central join if desired.
Plan lettering in the wider outer half
Write all eight names and dates on the paper plan before piping. Keep names short: initials or a nickname plus a compact date work better than a full formal name. Within each wedge, place the name along the wider outer half and the smaller date below it toward the center. Leave about 1 cm at the rim for tiny flowers and keep a narrow clear path along the two sector boundaries.
At a radius of 7 cm, a 45-degree sector offers only about 5.5 cm of arc width, and even less straight-line room once margins are allowed. Practice your actual words at that scale. Pipe with a 1–2 mm round opening, keeping icing smooth and flowing without stretching. Letter all names first, then dates, then add one or two tiny flowers near each outer corner. The generated hero is a blank design concept; personalization is added by you.
Repair one sector and cut cleanly
For a spelling mistake, chill, lift only the letters with a small spatula and touch up with the saved matching pastel. Do not smear wet dark writing into the sector. If a boundary becomes mixed, use a clean sharp tool to lift the narrow contaminated line and replace it with the correct colors; keep the repair shallow. Save a teaspoon of every shade before filling the bags.
Chill the finished cake until the top is firm. Cut along all eight radial boundaries using a warm, fully dried knife and wipe after each cut, working down through the cake rather than dragging sideways across lettering. Eight design sectors are not automatically eight suitable servings: a 20 cm cake may be portioned further based on the chosen recipe. Place each named wedge on a plate before subdividing it if the personal allocation matters.
Presentation, transport and storage
Place the finished dessert on a clean food-safe board or plate and use a box with clearance above and beside every decoration. Chill before transport, support the board from underneath and keep it level on a nonslip surface in a cool vehicle. Avoid adding paper cards, fabric, wire or florist materials to the edible surface. The concept hero illustrates the intended look; it is not a photograph of a tested result.
Refrigerate covered at 4°C or colder. For best quality, plan to serve within 3 days, following any shorter limit on your cake, filling, frosting or decoration packaging. This is a conservative planning window, not a validated shelf-life claim. Keep leftovers covered and refrigerate promptly. Soften only the cake portions you will serve briefly in a cool room.
Keep perishable desserts out of refrigeration for no more than two hours in total, reduced to one hour above 32°C / 90°F; decorating, transport and display time count together. Use a clean knife and wipe it between portions. This temperature and time guidance follows the FDA’s safe storage advice (https://www.fda.gov/consumers/consumer-updates/are-you-storing-food-safely).
The little details
- Draw every name at full scale before decorating.
- Alternate sectors to reduce contact with soft neighboring colors.
- Keep lettering clear of cutting lines.
- Record the color order before moving bowls and bags.
Your questions, answered
How is this different from a four-quarter cake?
It uses eight measured 45-degree sectors, eight pre-weighed frosting portions and a narrower lettering plan. Halving a four-person layout without shortening names tends to crowd the center.
Can I make this on a 15 cm cake?
The wedges will be much narrower. Use initials and omit dates, or keep the 20 cm diameter for the full name-and-date layout.
Does each sector need a different cake flavor?
No. The design divides the frosting top. All eight sectors can share one sponge and filling, following the recipe’s yield and storage guidance.
Made it? Let’s talk.
Share how your bake went, ask a question, or pass on a helpful tip. There’s a seat for you here.
A kind kitchen is a happy kitchen. Our community guidelines →
No comments yet. Be the first to say hello.