 1 comment
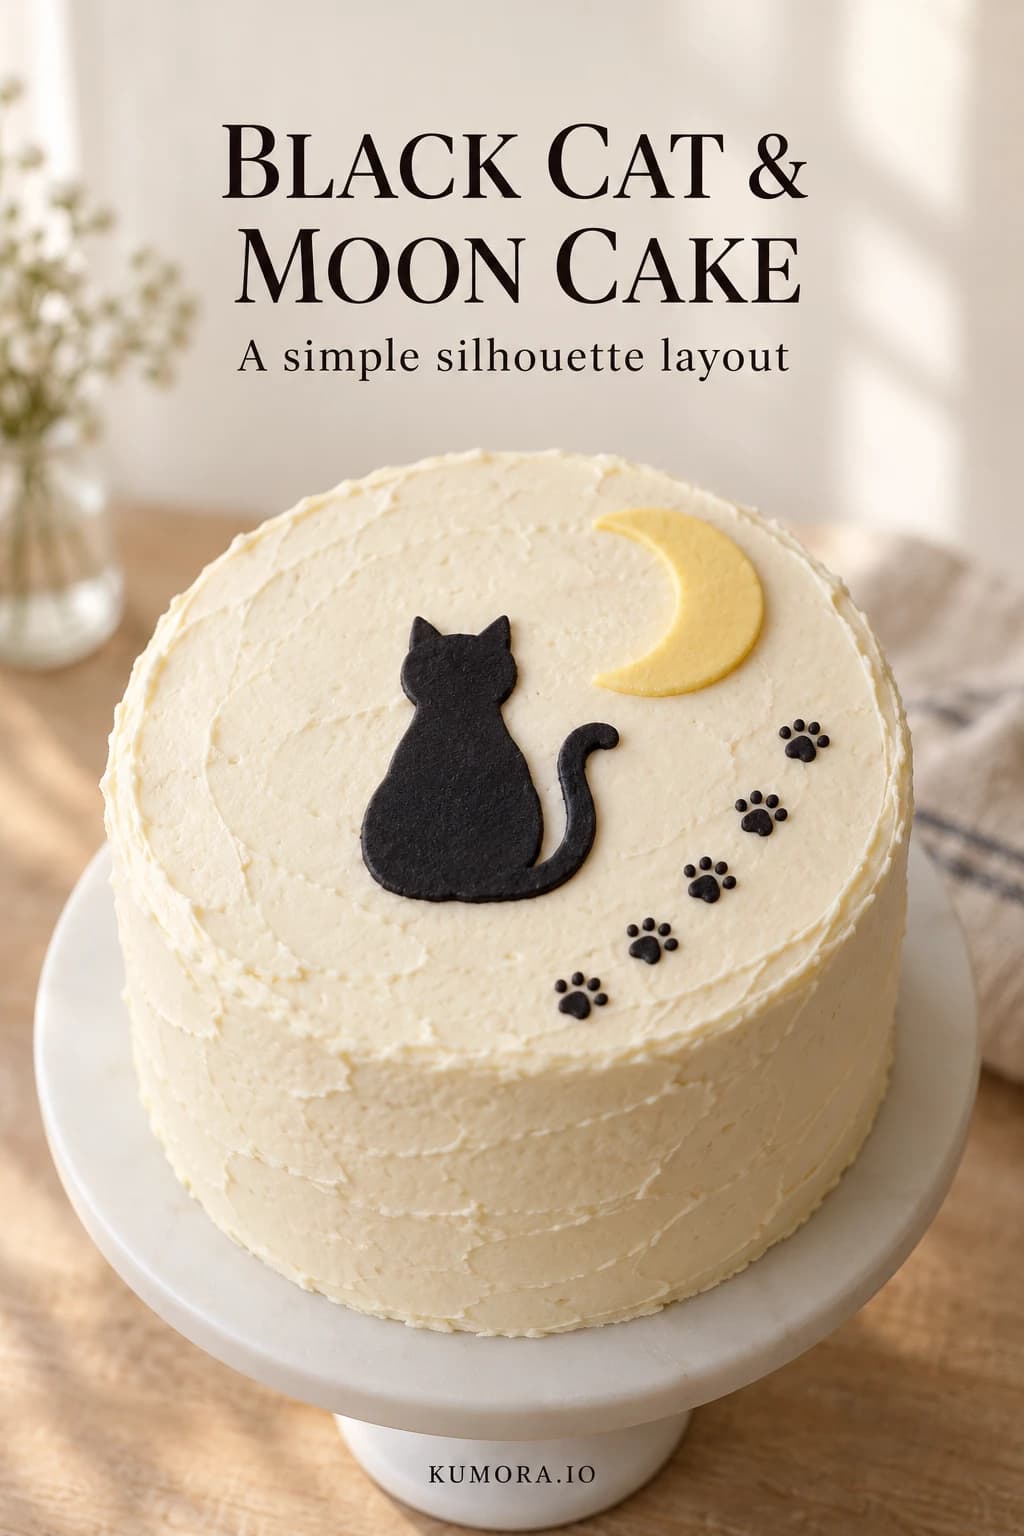
A flat cat silhouette and pale crescent moon make a simple Halloween cake without a tall topper. This original Kumora decorating guide begins with a baked, cooled cake and prepared buttercream. The concept image illustrates the intended layout; this method has not been kitchen-tested.
Before you start
- One cooled 15 cm round cake, about 6 cm high, from a trusted recipe
- 650 g prepared ivory piping buttercream, plus 20 g black buttercream for paw prints
- 40 g black fondant and 20 g pale yellow fondant, labeled edible
- Turntable, scraper, offset spatula, small rolling pin and clean craft knife reserved for food
- Food-safe parchment, paper sketch, 1–2 mm round piping tip and a 20 cm board
Prepare a firm ivory canvas
Attach the cake to its board with a small dab of frosting. Reserve roughly 120 g ivory buttercream for a thin crumb coat, 480 g for the final coating and 50 g for attachment and repairs. These are planning quantities; any internal filling is separate. Chill the crumb coat until firm, then spread a fairly even outer coat and leave shallow spatula marks on the sides.
Smooth the top enough for flat shapes to lie against it. Keep a clear area of about 7 cm for the cat at the lower left and 5 cm for the moon at the upper right. Leave a path between them for small paw prints. Chill until a light touch no longer lifts frosting.
Cut simple edible shapes
Draw a seated cat about 6–7 cm tall: a broad rounded body, a small head with two triangular ears and a curved tail attached to the body. Keep the tail about 5 mm wide at its thinnest point to reduce breakage. Draw a crescent about 4–5 cm across, with blunt tips. Test the paper layout above the cake, then remove all paper before decorating.
Roll black fondant to about 2–3 mm thick on food-safe parchment, following the product’s handling directions. Cut the outline with a clean knife used only for food, lift away the excess and smooth rough edges. Make the moon from pale yellow fondant in the same way. Let both pieces firm on a flat surface until they can be lifted without stretching; drying time varies with the product and humidity.
Attach the silhouettes flat
Lift each shape with a thin spatula supporting its full base. Add a few small buttercream dabs beneath it, then lay it flat on the chilled cake. Press only enough to make contact, keeping black fondant away from areas that should remain white. No hidden supports are needed for this flat design.
If a tail breaks, attach the body first and position the tail beside it with a little frosting at the join. If the shape stretches badly, roll and recut it instead of forcing it into place. Avoid wetting the fondant to make it stick: moisture can soften it and encourage dark color to bleed.
Pipe a short paw-print trail
Fit a bag with a 1–2 mm round opening and add the black buttercream. On parchment, practice one oval pad and three or four smaller toe dots above it. Keep each completed paw about 8–10 mm across. Stop pressure before lifting the tip to avoid long peaks.
Pipe four or five prints in a gentle curve toward the cat, leaving space between them. A few clear shapes are easier to read than many crowded prints. Chill a misplaced dot until firm, lift it with a small clean tool and patch the ivory base before trying again.
Transport and serve
Keep the cake level on its board in a box with space around the frosting. Follow the shortest storage limit for the cake, filling and buttercream. If a component requires refrigeration, keep it refrigerated and follow the fondant maker’s advice about condensation; attach moisture-sensitive decorations near serving.
Check the fondant and frosting labels for allergens and tell guests what was used. Cut with a clean knife, wiping it between slices so the black decoration does not smear across the ivory frosting. This is a decorating guide, not a sponge recipe or a validated shelf-life plan.
The little details
- Use a broad cat body and a thick tail for easier handling.
- Keep the two silhouettes flat and leave room for the paw prints.
- Practice the small dots on parchment before piping on the cake.
Your questions, answered
Do I need a freestanding topper?
No. The cat and moon lie flat on the cake. This keeps the construction simple and avoids hidden supports.
Can I use white chocolate for the moon?
A thin flat shape made from an edible molding product can work. Follow its handling directions and let it firm before moving it; it will behave differently from fondant.
Made it? Let’s talk.
Share how your bake went, ask a question, or pass on a helpful tip. There’s a seat for you here.
A kind kitchen is a happy kitchen. Our community guidelines →
Lovely recipe!