 0 comments
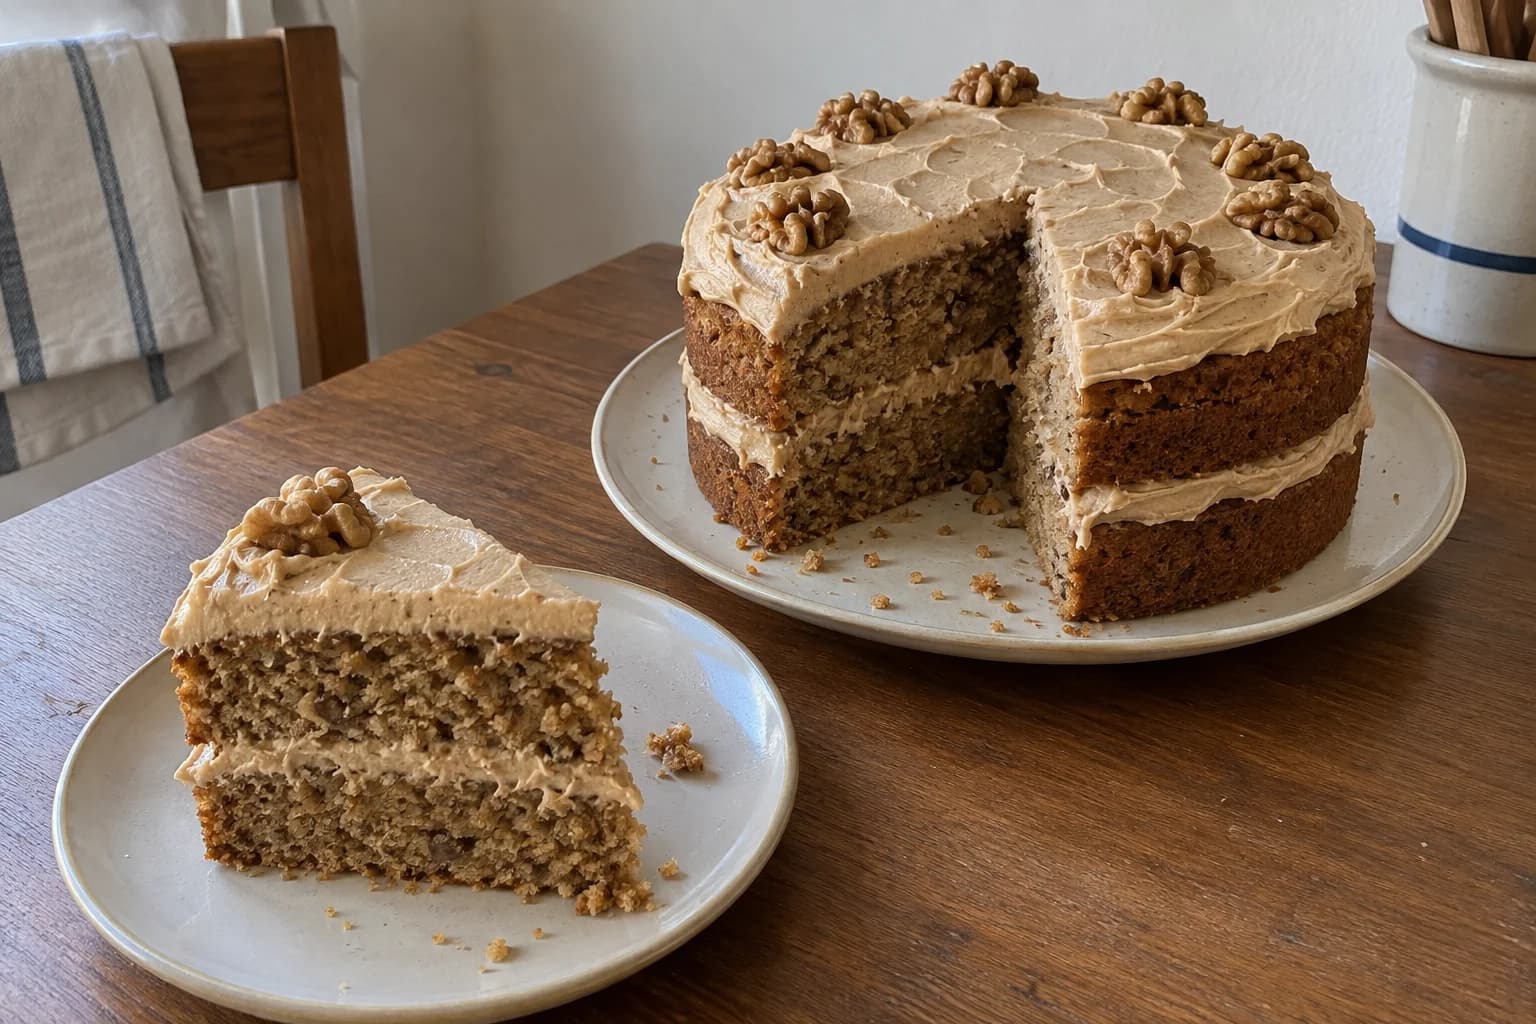
This coffee walnut cake puts coffee in both the sponge and the buttercream. Chopped walnuts add texture, while bare cake sides and loose spoon swirls keep the decorating manageable. It is a compact two-layer cake for a small celebration, with enough detail in a cut slice to feel special without elaborate piping. Unlike an American crumb-topped coffee cake, this one is actually coffee-flavoured. This is an original Kumora recipe draft, not yet kitchen-tested; check the layers for doneness rather than relying on the clock alone.
Before you start
- Two 6-inch / 15-cm round metal cake pans, at least 2 inches / 5 cm deep
- Kitchen scale, parchment and cooling rack
- Electric hand mixer or stand mixer, two bowls and spatula
- Small bowl for dissolving coffee and a sharp knife for the walnuts
- Cake plate and spoon or small offset spatula
A small layer cake with a clear coffee flavour
Two 6-inch pans give this cake its compact shape. Divide the batter by weight so the layers bake at a similar rate and stack evenly. Wider pans will make shorter layers, so do not assume an 8-inch conversion will have the same appearance or baking time.
Instant espresso powder or instant coffee is dissolved in a small amount of hot water. Ground coffee beans do not dissolve in the same way and can leave a gritty crumb. Ordinary brewed coffee would add much more liquid for a similar flavour, so it is not a direct swap here.
Prepare the walnuts before mixing the batter
Check shelled walnuts for hard shell fragments and chop them into small pieces, around the size of a lentil. Very large pieces make it harder to cut a neat slice and can interrupt the light cake structure. Set aside eight intact walnut halves for the top before chopping the rest.
Use fresh-tasting nuts. If a walnut tastes bitter or smells like old oil, replace the batch rather than trying to cover the flavour with coffee. Toasting is optional: if you choose to toast them lightly, cool them completely before adding them to the batter.
Cream the butter, then add the eggs gradually
The cake butter should feel pliable without looking oily. Beat it with the sugar until the mixture becomes lighter and airy, scraping the bowl as you work. This is an aeration step, not simply a way to make the two ingredients disappear into each other.
Beat in the eggs in small additions. If the mixture begins to look slightly split, add a spoonful from the measured flour, then continue. Fold in the remaining dry ingredients, yogurt, cooled coffee concentrate and walnuts gently; prolonged beating after the flour goes in is unnecessary.
Keep the frosting coffee concentrated and cool
Dissolve the frosting coffee separately and let it cool before it touches the butter. Hot concentrate softens the buttercream and can make it look greasy. Mix the butter and icing sugar first, then add the coffee and only enough milk to make a spreadable texture.
The aim is a soft frosting that holds a shallow spoon ridge, not a loose coffee sauce. A little liquid makes a large difference. If it seems too soft, pause and chill it briefly before deciding whether more sugar is needed.
Fill the middle and leave the sides open
Cool both cake layers completely, then level a pronounced dome if necessary. Spread about half the buttercream over the first layer, stopping just short of the edge. Set the second cake on top and press only gently; too much pressure pushes the filling out.
Spread the remaining frosting on top in broad spoon curves. Position the eight walnut halves around the edge, leaving the centre mostly clear. The exposed sponge sides are intentional. They show the actual layers and avoid the need for a smooth outer coating or piping bag.
Slice and store without drying the sponge
Chill the assembled cake for about 20 minutes if the filling feels soft, then cut with a sharp knife and wipe it between slices. For the best texture, let the cut portions stand briefly at room temperature so the butter-based sponge and frosting soften.
Keep the assembled cake covered in the refrigerator and use within 3 days. For advance preparation, wrap completely cooled unfrosted layers and freeze for up to a month. Thaw while wrapped before filling. This recipe contains walnuts throughout, so removing the top decoration does not make it nut-free.
6-Inch Coffee Walnut Layer Cake
- Makes, at 1×
- 8 slices from one two-layer 6-inch cake
- Prep
- 40 min
- Baking
- 30 min
- Start to finish
- About 2 hr 30 min
Allow about 60 minutes for the layers to cool and 20 minutes to chill after assembly, in addition to preparation and baking.
Original recipe draft · not yet kitchen-tested. Baking times are estimates; use the doneness checks in the method.
Ingredients
Cake layers
Coffee buttercream
Finish
Let’s make it
- Heat the oven to 175°C / 350°F conventional, or 155°C fan. Grease two 6-inch pans and line the bases with parchment. Dissolve the 6 g cake coffee in 15 ml hot water and leave to cool.
- Whisk the flour, baking powder and cake salt together. Beat the 170 g cake butter with the sugar for 3 to 4 minutes until lighter and fluffy, scraping the bowl as needed.
- Lightly beat the eggs in a jug, then add them gradually to the creamed butter while mixing. If the mixture begins to split, add a spoonful from the measured flour mixture and continue.
- Fold in half the dry mixture, then the yogurt and cooled cake coffee, followed by the remaining dry mixture. Fold in the chopped walnuts. Scrape the bottom of the bowl and stop when evenly combined.
- Divide the batter equally between the pans and level the tops. Bake for approximately 27 to 34 minutes. Start checking at 27 minutes: the centres should spring back and a skewer should show no wet batter.
- Cool in the pans for 10 minutes, then turn out, remove the parchment and cool completely on a rack. Allow around 60 minutes total cooling, or longer if the centres still feel warm.
- For the frosting, dissolve 5 g coffee in 15 ml hot water and cool. Beat the 150 g frosting butter until smooth, then gradually mix in the sifted icing sugar and frosting salt. Add the cooled coffee. Add milk a teaspoon at a time only until the frosting spreads easily; you may not need all 20 ml.
- Level the cold cake layers if needed. Place the first layer on a serving plate and spread about half the buttercream over it, leaving a small margin at the edge. Add the second layer without pressing hard.
- Spread the remaining buttercream over the top in spoon swirls, leaving the cake sides bare. Arrange the eight walnut halves around the rim. Chill for about 20 minutes if needed to support the filling before slicing.
Original Kumora recipe draft; not yet kitchen-tested. Baking times are estimates. Contains wheat, eggs, milk and walnuts. Coffee flavour and caffeine vary by product. Refrigerate the assembled cake covered and use within 3 days. The generated image illustrates the intended two-layer structure.
The little details
- Cool both coffee concentrates before adding them to butter mixtures.
- Use instant coffee or instant espresso powder, not ground coffee beans.
- Keep the layers level and the filling modest; a small cake does not need a thick frosting wall to look finished.
Your questions, answered
Is coffee walnut cake the same as American coffee cake?
No. This recipe contains coffee in the sponge and buttercream. Many American coffee cakes are crumb-topped cakes served with coffee rather than flavoured with it.
Can I use decaffeinated instant coffee?
Yes, it can provide the coffee flavour using the same measured amount. Choose a soluble instant product rather than ground beans.
Why are the sides left unfrosted?
The recipe is designed as a simple sandwich cake with frosting between the layers and on top. A full outer coating would need more buttercream.
Can I use one deep pan and cut the cake in half?
The draft is written for two pans. One deep cake takes longer to bake and may brown before its centre sets, so that change needs separate testing.
Made it? Let’s talk.
Share how your bake went, ask a question, or pass on a helpful tip. There’s a seat for you here.
A kind kitchen is a happy kitchen. Our community guidelines →
No comments yet. Be the first to say hello.